Spring
Table of Contents generated with DocToc (opens new window)
- 常用依赖
- 常用bean的xml文件配置
- 依赖注入相关
- 多配置文件
- 注解说明
- 代理模式
- SpringAop
- spring整合mybatis
# 常用依赖
<dependencies>
        <dependency>
            <groupId>junit</groupId>
            <artifactId>junit</artifactId>
            <version>4.11</version>
        </dependency>
        <!-- https://mvnrepository.com/artifact/org.springframework/spring-webmvc -->
        <dependency>
            <groupId>org.springframework</groupId>
            <artifactId>spring-webmvc</artifactId>
            <version>5.3.5</version>
        </dependency>
        <dependency>
          <groupId>org.springframework</groupId>
          <artifactId>spring-jdbc</artifactId>
          <version>5.3.5</version>
        </dependency>
        <dependency>
            <groupId>org.projectlombok</groupId>
            <artifactId>lombok</artifactId>
            <version>1.18.18</version>
        </dependency>
    </dependencies>
2
3
4
5
6
7
8
9
10
11
12
13
14
15
16
17
18
19
20
21
22
23
# 常用bean的xml文件配置
<?xml version="1.0" encoding="UTF-8"?>
<beans xmlns="http://www.springframework.org/schema/beans"
       xmlns:xsi="http://www.w3.org/2001/XMLSchema-instance"
       xmlns:context="http://www.springframework.org/schema/context"
       xsi:schemaLocation="http://www.springframework.org/schema/beans
        https://www.springframework.org/schema/beans/spring-beans.xsd
        http://www.springframework.org/schema/context
        https://www.springframework.org/schema/context/spring-context.xsd
        http://www.springframework.org/schema/aop
        https://www.springframework.org/schema/aop/spring-aop.xsd">

    <!--    配置注解的支持-->
    <context:annotation-config/>
</beans>
2
3
4
5
6
7
8
9
10
11
12
13
14
# 依赖注入相关
# spring使用xml< property>标签注入bean属性的注意事项
只要bean中有setXxx方法,不管bean中是否有xxx属性(Xxx的小驼峰形式),只要<property>的name属性写上了Xxx的小驼峰形式, 该setXxx()方法就会被执行。此种方式适用于所有类(自定义类或导入依赖中的类或jdk自带的类)如果bean中没有setXxx方法,又要给xxx属性赋值,会出现无setter方法的异常java的八种基本类型(int,float,double,long,boolean,short,byte,char)+String,在Spring中被定义为基本类型,属性注入时使用<property>标签的value属性即可;如果是这九种类型之外的类型,注入时需要使用ref属性,且此ref属性的值,也必须存在于Spring容器中(即在xml或config类中注册bean)
# 自动注入byName,byType
byName(按名称注入):java类中所有引用类型的
属性名和Spring容器中(配置文件)< bean>标签的id的值一样,且数据类型是一致的,这样的容器中的bean,Spring能够自动赋值给bean的引用类型<bean id="xx" class="yy" autowire="byName"> <!--简单类型属性赋值--> </bean>1
2
3byType(按类型注入):java类中引用类型的数据类型和Spring容器中的< bean>标签的class属性是同源关系的,这样的bean能被Spring自动赋值给别的bean的引用类型。
PS:byType要保证满足条件的引用类型bean在Spring容器中只存在一个实例,否则会出现异常
同源的意思:
java类中引用类型属性的数据类型和bean的class的值一样java类中引用类型属性的数据类型和bean的class是父子类关系java类中引用类型属性的数据类型和bean的class是接口和实现类关系
<bean id="xx" class="yy" autowire="byType">
<!--简单类型属性赋值-->
</bean>
1
2
3
# 多配置文件
优势
- 每个文件的大小比单独一个文件要小得多,效率高
- 避免多人协作编码时的冲突
多配置文件的分配方式:
- 按功能模块,一个模块一个配置文件
- 按类的功能,数据库相关的配置一个文件、做事务的功能一个文件、service一个等等
使用方式
创建一个主配置文件applicationContext.xml(主配置文件仅用于导入其他配置文件,不定义bean等),使用< improt>标签将其他配置文件导入。
<import resource="classpath:(resource目录下的目录(如果存在子目录的话))/文件名"/>1resource的值即配置文件所在的类路径(classpath),classpath即为生成的target文件夹的classes目录。
在Spring的配置文件中要指定其他文件的位置,需要使用classpath,告诉Spring去哪里加载读取文件
如果配置文件都是已某一相同前缀命名,可以使用通配符一次性导入所有文件
<import resource="classpath:mulu/spring-*.xml"/>1上述是因为所有配置文件都是spring-xxx.xml格式的
注意,在使用通配符时,主配置文件名不能以子配置文件的前缀开头,因为会造成死循环。最好主文件叫applicationContext.xml,子配置文件以模块划分:spring-mvc.xml、spring-mybatis.xml、spring-datasource.xml等
# 注解说明
# 使用前的准备
需要spring-aop的依赖(在导入spring-context时已导入)
在类中加入spring的注解
在spring的配置文件中,加入一个组件扫描器的标签,说明注解在项目中的位置(即去哪里扫描注解并使其生效)
<!--    配置注解的支持,注解驱动-->
    <context:annotation-config/>
<!--    指定要扫描的包,这个包下的注解就会生效,其实扫描包已经包含了注解驱动,所以使用扫描包时上面的语句可不用-->
    <context:component-scan base-package="com.zdk.pojo"/>
1
2
3
4
@Autowired:自动注入引用类型,
默认使用byType;也可以使用
byName:如果Autowired不能唯一自动装配上属性,则需要通过@Qualifier(value="")指定bean名字来装配@Autowired(require=true):require属性,默认为true,如果此时属性注入失败(没有需要的bean),程序会报错如果require=false,不会报错,要注入的属性会为null
@Nullable:字段标记了这个注解,说明该字段可以为null
@Resource:自动装配,也是先通过类型再名字。
Spring提供了对
jdk中@Resource注解的支持。@Resource注解既可以按名称匹配Bean,也可以按类型匹配Bean。默认是按名称注入。使用该注解,要求jdk必须是6及以上版本。@Resource可加载属性上(推荐使用),也可加在set方法上@Resource注解若不带任何参数,采用默认按名称的方式注入。如果按名称不能注入bean,则会按照类型进行Bean的匹配注入如果使用
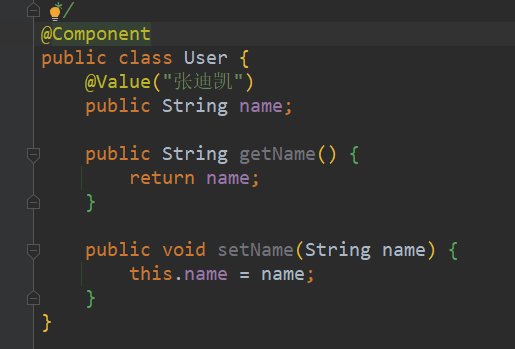
@Resource(name="xxx")就只会进行byName的匹配,找不到也不会按byType再次去找@Component(value=""):注解(义为组成部分、组件)等价于,<bean id="user" class="com.zdk.pojo.User />。value为bean的名称。
value不写时,bean的名称由Spring指定,为类名首字母小写后的单词@Value注解的使用(放到属性上和set方法上是一样的)
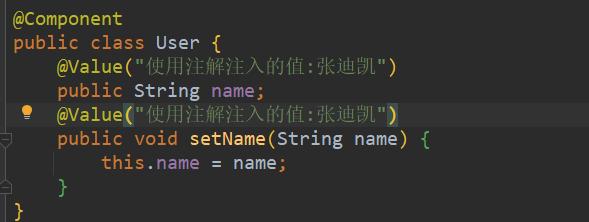
@Repository注解用于dao层时的注入,和@Component类似 只是习惯于在dao用此注解
@Service注解用于service层时的注入
@Controller注解用于controller层的注入,同上
以上注解使用时必须被<context:component-scan base-package="com.zdk.pojo"/> 扫描到才会生效,这三个和@Component功能一样,等价。都代表将某个类注入到 spring容器中,进行装配bean
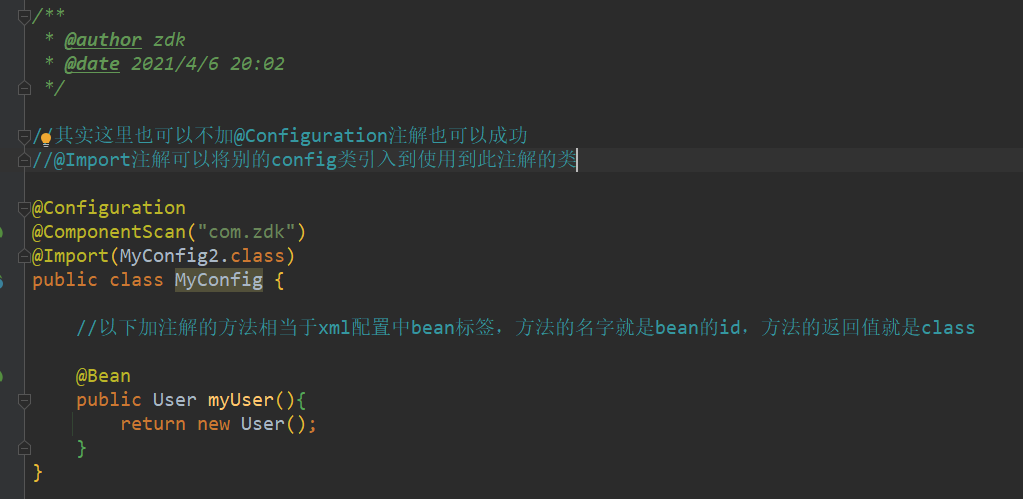
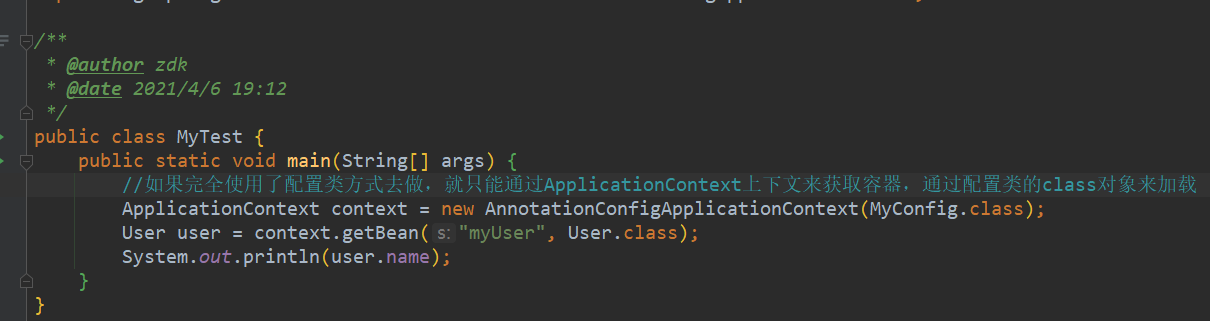
使用纯Java形式完成bean.xml配置文件的操作 大致的步骤是,创建一个配置类,使用@Configuration进行注解,在其内部的方法中, 使用@Bean进行注解,@Configuration就类似一个< beans>标签,@Bean相当于一个< bean>子标签, @ComponentScan("com.zdk")是扫描包用的,@Import(MyConfig2.class)可以引入其他的配置类
# 代理模式
# 角色分析
- 抽象角色:一般使用接口或者抽象类来解决
- 真实角色:被代理的角色
- 代理角色:代理真实角色,代理真实角色后,可以实现代理角色的功能,且可以做一些 其他的附属(公共)操作
# 代码步骤
- 写接口
public interface Rent {
public void rent();
}
2
3
- 真实角色
public class Host implements Rent{
    @Override
    public void rent() {
        System.out.println("房东要出租房子");
    }
}
2
3
4
5
6
- 代理角色
//代理类(代理角色)

public class Proxy {
    private Host host;
    public Proxy() {
    }
    public Proxy(Host host) {
        this.host = host;
    }
    public void rent(){
        host.rent();
    }
    public void seeHouse(){
        System.out.println("中介带你看房");
    }
    public void heTong(){
        System.out.println("中介和你签租赁合同");
    }
    public void money(){
        System.out.println("中介收中介费");
    }
}
2
3
4
5
6
7
8
9
10
11
12
13
14
15
16
17
18
19
20
21
22
- 客户端访问代理角色
public class Client {
    public static void main(String[] args) {
        Host host=new Host();
        //代理,中介帮房东出租房子,但是中介(代理角色)能执行一些其他附属操作
        Proxy proxy = new Proxy(host);
        //通过代理实现,不用找房东,直接找中介租房
        proxy.rent();
    }
}
2
3
4
5
6
7
8
9
# 1.静态代理
# 好处:
- 可以使真实角色的操作更加纯粹,不用去关注一些公共的业务
- 公共业务就交给代理角色,实现了业务的分工
- 公共业务发生扩展时,可以方便进行集中管理 ####缺点:
- 一个真实角色就会产生一个代理角色;代码量翻倍,开发效率变低,可用动态代理解决
# 2.动态代理
# 好处:
- 可以使真实角色的操作更加纯粹,不用去关注一些公共的业务
- 公共业务就交给代理角色,实现了业务的分工
- 公共业务发生扩展时,可以方便进行集中管理
- 在目标类源代码不改变的情况下,增加功能
- 减少代码的重复
- 专注业务逻辑代码
- 解耦合,让业务功能和日志、事务、非业务功能分离
# 特点
- 动态代理和静态代理角色一样
- 动态代理的代理类是动态生成的,不是直接写好的
- 动态代理分为两大类
- 基于接口的动态代理
- JDK动态代理
- 基于类的动态代理
- cglib
- Java字节码实现:Javassist
# 需要了解两个类
Proxy(代理)
invocationHandler(调用处理程序)
# 使用JDK动态代理示例
handler:
public class MyInvocationHandler implements InvocationHandler {
    private Object target;

    public MyInvocationHandler(Object target) {
        this.target = target;
    }
    @Override
    public Object invoke(Object proxy, Method method, Object[] args) throws Throwable {
        System.out.println("执行时间-"+ new Date());
        Object invoke = method.invoke(target, args);
        System.out.println("执行完毕,提交事务");
        return invoke;
    }
}
2
3
4
5
6
7
8
9
10
11
12
13
14
被代理类及其实现的接口:
@SuppressWarnings("all")
public interface SomeService {
    void doSome();
    void doOther();
}
public class SomeServiceImpl implements SomeService {
    @Override
    public void doSome() {
        System.out.println("执行doSome()");
    }

    @Override
    public void doOther() {
        System.out.println("执行doOther()");
    }
}
2
3
4
5
6
7
8
9
10
11
12
13
14
15
16
测试
public class MainApp {
    public static void main(String[] args) {
        SomeService target = new SomeServiceImpl();
        MyInvocationHandler handler = new MyInvocationHandler(target);
        SomeService proxyService =(SomeService) Proxy.newProxyInstance(target.getClass().getClassLoader(), target.getClass().getInterfaces(), handler);
        proxyService.doSome();
    }
}
//输出
执行时间-Mon Nov 29 19:40:48 CST 2021
执行doSome()
执行完毕,提交事务
2
3
4
5
6
7
8
9
10
11
12
注意:
JDK动态代理要求被代理的类必须实现了某个接口,这是JDK动态代理方式的局限性
# SpringAop
# 如何理解AOP
- 需要在分析项目功能时,找出切面
- 合理安排切面的执行时间(在目标方法前还是目标方法后)
- 合理安排切面执行的位置(在哪个类的哪个方法增加增强功能)
# AOP名词
- 横切关注点:跨越应用程序多个模块的方法或功能。即是,与我们业务逻辑无关的,但是我们需要关注的部分,就是横切关注点。如日志,安全,缓存,事务等等....
- 切面(ASPECT)︰上述例子中使用的日志、事务都是切面。切面一般都是非业务方法,独立使用的。
- 通知(Advice):切面必须要完成的工作。即,它是类中的一个方法。
- 目标(Target)︰被通知对象。
- 代理(Proxy)︰向目标对象应用通知之后创建的对象。
- 切入点(PointCut):切面通知执行的“地点"的定义。
- 连接点(JointPoint) :与切入点匹配的执行点。
# spring实现AOP 方式一:使用原生springAPI接口
<?xml version="1.0" encoding="UTF-8"?>
<beans xmlns="http://www.springframework.org/schema/beans"
       xmlns:xsi="http://www.w3.org/2001/XMLSchema-instance"
       xmlns:context="http://www.springframework.org/schema/context"
       xmlns:aop="http://www.springframework.org/schema/aop"
       xsi:schemaLocation="http://www.springframework.org/schema/beans
        https://www.springframework.org/schema/beans/spring-beans.xsd
        http://www.springframework.org/schema/context
        https://www.springframework.org/schema/context/spring-context.xsd
        http://www.springframework.org/schema/aop
        https://www.springframework.org/schema/aop/spring-aop.xsd">
    <!--    配置注解的支持-->
    <context:annotation-config/>
<!--    注册bean-->
    <bean id="userService" class="com.zdk.service.UserServiceImpl"/>
    <bean id="log" class="com.zdk.log.Log"/>
    <bean id="afterLog" class="com.zdk.log.AfterLog"/>
<!--    方式一:使用原生spring API接口-->
<!--    配置aop:需要导入aop的约束-->
    <aop:config>
<!--        需要一个切入点expression:需要在哪个地方去执行execution(要执行的位置:)-->
        <aop:pointcut id="pointCut" expression="execution(* com.zdk.service.UserServiceImpl.*(..))"/>
<!--        执行环绕增加-->
        <aop:advisor advice-ref="log" pointcut-ref="pointCut"/>
        <aop:advisor advice-ref="afterLog" pointcut-ref="pointCut"/>
    </aop:config>
</beans>
2
3
4
5
6
7
8
9
10
11
12
13
14
15
16
17
18
19
20
21
22
23
24
25
26
27
# 实现方式二:使用自定义类来实现AOP
//使用自定义类实现AOP

public class DiyPointCut {
    public void before(){
        System.out.println("========方法执行前========");
    }
    public void after(){
        System.out.println("========方法执行后========");
    }
}
2
3
4
5
6
7
8
9
10
<!--    方式二,使用自定义的类实现AOP-->
    <bean id="diy" class="com.zdk.diy.DiyPointCut"/>
    <aop:config>
<!--        自定义切面,ref为切面要引用的类-->
        <aop:aspect ref="diy">
<!--            切入点-->
            <aop:pointcut id="point" expression="execution(* com.zdk.service.UserServiceImpl.*(..))"/>
<!--        通知-->
            <aop:before method="before" pointcut-ref="point"/>
            <aop:after method="after"  pointcut-ref="point"/>
        </aop:aspect>
    </aop:config>
2
3
4
5
6
7
8
9
10
11
12
# 实现方式三:使用注解来实现AOP
//使用注解方式实现AOP

//使用注解标注这个类是一个切面

@Aspect
public class AnnotationPointCut {
    @Before("execution(* com.zdk.service.UserServiceImpl.*(..))")
    public void before(){
        System.out.println("========方法执行前========");
    }
    @After("execution(* com.zdk.service.UserServiceImpl.*(..))")
    public void after(){
        System.out.println("========方法执行后========");
    }

    //在环绕增强中,可以给定一个参数,代表我们要获取处理切入的点

    @Around("execution(* com.zdk.service.UserServiceImpl.*(..))")
    public void around(ProceedingJoinPoint joinPoint) throws Throwable {
        System.out.println("环绕前");
        System.out.println("方法签名(名称)Signature:"+joinPoint.getSignature());
        //执行around方法
        Object proceed = joinPoint.proceed();
        System.out.println("环绕后");
    }
}
2
3
4
5
6
7
8
9
10
11
12
13
14
15
16
17
18
19
20
21
22
23
24
25
26
<!--    方式三-->
    <bean id="annotationPointCut" class="com.zdk.diy.AnnotationPointCut"/>
<!--    要开启注解支持-->
    <aop:aspectj-autoproxy/>
2
3
4
# aop的技术实现框架:
spring:spring在内部实现了aop规范,spring主要在事务处理时使用aop。实际项目开发中很少使用spring的aop实现,因为spring的aop比较笨重
aspectJ:一个开源的专门做aop的框架。spring框架中集成了aspectJ框架,通过spring就能使用aspectJ的功能
aspectJ实现aop有两种方式
- 使用xml配置文件:配置全局事务
- 使用注解。实际项目中一般都使用注解,aspectJ有五个注解
# aspectJ框架的使用
切面的执行时间,这个执行时间在规范中叫做Advice(通知,增强)。在aspectJ框架中使用注解表示的
- @Before
- @AfterReturning
- @Around
- @AfterThrowing
- @After
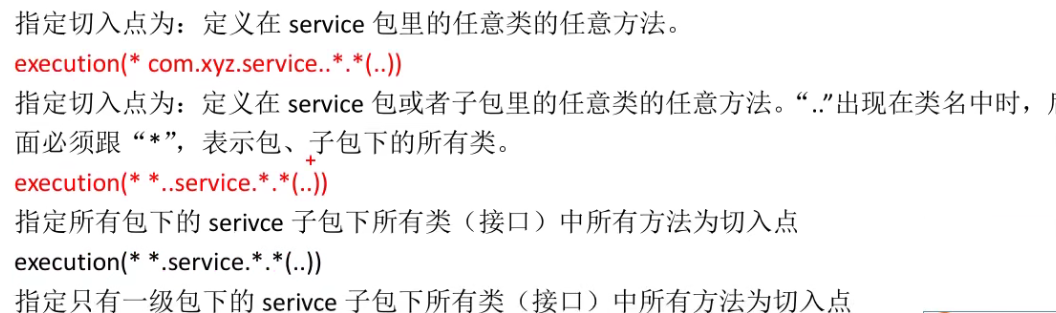
表示切面执行的位置,使用execution切入表达式
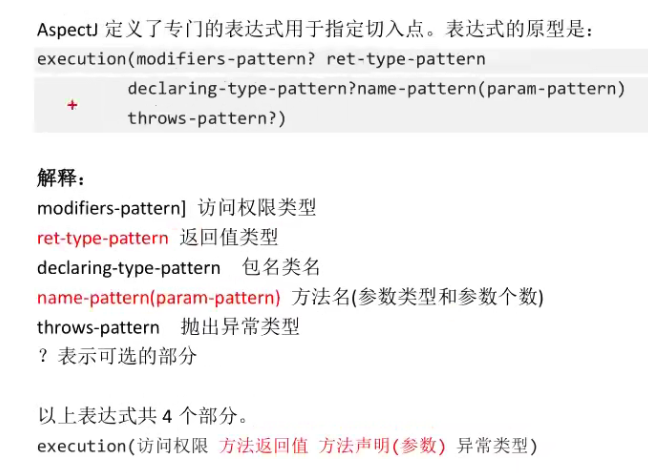
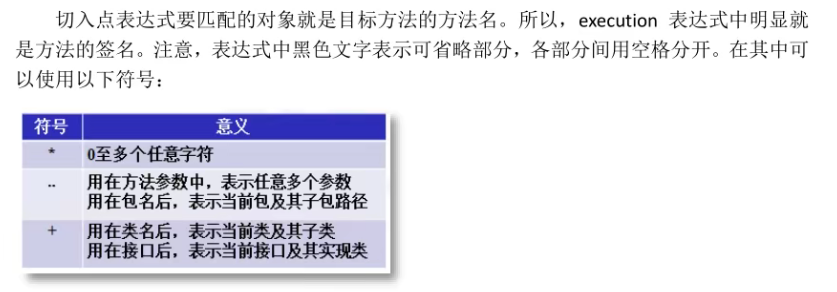
示例:
execution(public * *(..)):任意公共方法
execution(* set*(..)):任意一个方法名以"set"开头的方法
execution(* com.zdk.service.* .*(..)):service包里的任意类的任意方法
使用aspectJ实现aop的步骤
导入相关依赖
- spring依赖
- aspectJ依赖
创建目标类:接口和它的实现类,要做的是给类中的方法增加功能
创建切面类(一个普通类)
- 在类的上面加入@Aspect注解
- 在类中定义方法,方法就是切面要执行的功能代码
- 在方法上加入aspectJ中的通知注解,例如@Before
- 有需要的可以指定切入点表达式execution()
创建spring的配置文件:声明对象,把对象交给容器统一管理
声明目标对象
声明切面对象
声明aspectJ框架中的自动代理生成器标签:自动代理生成器用来完成对代理对象的自动创建
<!--    要开启注解支持:自动代理生成器
    这是aspectJ框架内部的功能,能创建目标对象的代理对象
    创建代理对象是在内存中实现的,修改目标对象内存中的结构,创建为代理对象
-->
    <aop:aspectj-autoproxy/>
1
2
3
4
5
# 代码示例
# 1.前置通知
# @Before
/**
 * @author zdk
 * @date 2021/12/5 17:40
 * 切面类
 */
@Aspect
@Component
public class MyAspect {

    /**
     * @Before 前置通知注解
     * 属性:value 是切入点表达式,表示切面的功能执行的位置
     * 位置:在方法的上面
     * 特点:
     * 1.在目标方法之前先执行
     * 2.不会改变目标方法的执行结果
     * 3.不会影响目标方法的执行
     */
    /**
     * 切面表达式的多种编写方式
     * execution(public void com.demo.SomeServiceImpl.doSome(String,Integer))
     * execution(void com.demo.SomeServiceImpl.doSome(String,Integer))
     * execution(void *..SomeServiceImpl.doSome(String,Integer))
     * execution(* *..SomeServiceImpl.doSome(..))
     * execution(* *..SomeServiceImpl.do*(..))
     */
    @Before(value = "execution(* *..SomeServiceImpl.do*(..))")
    public void myBefore(){
        //以下是要执行的功能代码
        System.out.println("前置通知:在目标方法执行前输出执行时间:"+new Date());
    }

    /**
     * 一个方法可以加入多个前置通知
     */
    @Before(value = "execution(* *..SomeServiceImpl.do*(..))")
    public void myBefore2(){
        //以下是要执行的功能代码
        System.out.println("前置通知2:在目标方法执行前输出执行时间:"+new Date());
    }
}
2
3
4
5
6
7
8
9
10
11
12
13
14
15
16
17
18
19
20
21
22
23
24
25
26
27
28
29
30
31
32
33
34
35
36
37
38
39
40
41
# service接口、实现类
public interface SomeService {
    void doSome(String name,Integer age);
}
@Service
public class SomeServiceImpl implements SomeService {
    @Override
    public void doSome(String name,Integer age) {
        System.out.println("--------执行目标方法---------");
    }
}
2
3
4
5
6
7
8
9
10
# 测试方法
@Test
    public void test1(){
        ApplicationContext applicationContext = new ClassPathXmlApplicationContext("applicationContext.xml");
        //注意这里需要使用someServiceImpl才能获取到bean,使用someService获取不到
        SomeService someService = applicationContext.getBean("someServiceImpl", SomeService.class);
        //类是 com.sun.proxy.$Proxy17  说明是被生成的代理类
        System.out.println(someService.getClass().getName());
        someService.doSome("张迪凯", 20);
    }
2
3
4
5
6
7
8
9
# 2.JoinPoint
JoinPoint代表了业务方法,即要加入切面功能的业务方法doSome(String,Integer) 作用是:可以在方法中获取方法执行时的信息,例如方法名称,方法的实参 这个JoinPoint参数的值是由框架赋予的,必须是切面方法的第一个位置的参数
# 示例
@Before(value = "execution(* *..SomeServiceImpl.do*(..))")
    public void myBefore(JoinPoint joinPoint){
        System.out.println("方法的签名(即定义):"+joinPoint.getSignature());
        System.out.println("方法的名称:"+joinPoint.getSignature().getName());
        //获取方法的实参
        Object[] args = joinPoint.getArgs();
        for (Object arg : args) {
            System.out.println("参数->"+arg);
        }
        //以下是要执行的功能代码
        System.out.println("前置通知:在目标方法执行前输出执行时间:"+new Date());
    }
2
3
4
5
6
7
8
9
10
11
12
# 3.后置通知
# @AfterReturning
/**
     * 后置通知
     * 方法的定义要求
     * 1.是公共方法 public
     * 2.方法没有返回值
     * 3.方法名称自定义
     * 4.方法有参数的,推荐类型为Object,参数名自定义
     */
    /**
     * @AfterReturning:后置通知
     * 属性:1.value 切入点表达式
     *      2.returning 自定义的变量,表示目标方法的返回值,此自定义变量名必须和通知方法的形参名一样
     * 特点:1.在目标方法之后执行
     *      2.能获取到目标方法的返回值,可以根据这个返回值做不同的处理操作
     *      3.可以修改这个返回值,修改后会影响方法的返回值
     * @param res
     */

    @AfterReturning(value = "execution(* *..SomeServiceImpl.doOther(..))",returning = "res")
    public void myAfterReturning(Object res){
        //Object res:是目标方法执行后的返回值,根据返回值做切面的功能处理
        System.out.println("后置通知:在目标方法执行后执行,获取的返回值是:"+res);
        Person objRes =(Person) res;
        objRes.setName("你被修改了");
    }
/**
	接口和实现类
**/
public interface SomeService {
    void doSome(String name,Integer age);
    Person doOther(String name);
}
@Service
public class SomeServiceImpl implements SomeService {
    @Override
    public void doSome(String name,Integer age) {
        System.out.println("--------执行目标方法---------");
    }

    @Override
    public Person doOther(String name) {
        System.out.println("--------执行doOther(String name)方法---------");
        return new Person(name, 18);
    }
}
2
3
4
5
6
7
8
9
10
11
12
13
14
15
16
17
18
19
20
21
22
23
24
25
26
27
28
29
30
31
32
33
34
35
36
37
38
39
40
41
42
43
44
45
# 测试方法
    @Test
    public void test2(){
        ApplicationContext applicationContext = new ClassPathXmlApplicationContext("applicationContext.xml");
        SomeService someService = applicationContext.getBean("someServiceImpl", SomeService.class);
        Person res = someService.doOther("张迪凯");
        System.out.println(res);
    }
/*
============输出:
方法的签名(即定义):Person com.demo.SomeService.doOther(String)
方法的名称:doOther
参数->张迪凯
前置通知:在目标方法执行前输出执行时间:Sun Dec 05 19:49:00 CST 2021
前置通知2:在目标方法执行前输出执行时间:Sun Dec 05 19:49:00 CST 2021
--------执行doOther(String name)方法---------
后置通知:在目标方法执行后执行,获取的返回值是:Person(name=张迪凯, age=18)
Person(name=你被修改了, age=18)
*/
2
3
4
5
6
7
8
9
10
11
12
13
14
15
16
17
18
# 4.环绕通知
# @Around
/**
     * @Around:环绕通知
     *      属性:value 切入点表达式
     *      特点:
     *      1.是功能最强的通知
     *      2.在目标方法执行前、后都能进行功能的增强
     *      3.可以控制目标方法是否被调用执行
     *      4.可以修改原来的目标方法的执行结果,影响最终的调用结果
     * 环绕通知等同于jdk动态代理使用InvocationHandler
     *
     * 参数:ProceedingJoinPoint
     *      就等同于动态代理invoke方法中的Method参数
     *      作用:用于执行目标方法
     * 返回值:环绕方法的返回值就是要执行的目标方法的返回值,可以被修改
     *
     *
     * @param proceedingJoinPoint
     * @return
     */
    @Around(value = "execution(* *..SomeServiceImpl.doFirst(..))")
    public Object myAround(ProceedingJoinPoint proceedingJoinPoint) throws Throwable {
        //实现环绕通知
        Object result = null;
        //1.环绕:目标方法执行前增强
        System.out.println("环绕通知:目标方法执行前输出时间:"+new Date());
        //2.调用执行目标方法
        /*
         * 相当于 method.invoke();result = doFirst();
         * 可以根据参数条件等决定目标方法是否执行
         */
        result = proceedingJoinPoint.proceed();
        //3.环绕:目标方法执行后增强
        System.out.println("环绕通知:目标方法执行后,提交事务");
        //4.返回方法返回结果
        return result;
    }


/**
	接口和实现类
**/
public interface SomeService {
    void doSome(String name,Integer age);
    Person doOther(String name);
    Person doFirst(String name,Integer age);
}

@Service
public class SomeServiceImpl implements SomeService {
    @Override
    public void doSome(String name,Integer age) {
        System.out.println("--------执行目标方法---------");
    }

    @Override
    public Person doOther(String name) {
        System.out.println("--------执行doOther(String name)方法---------");
        return new Person(name, 18);
    }

    @Override
    public Person doFirst(String name, Integer age) {
        System.out.println("执行doFirst(String name, Integer age)方法");
        return new Person(name, age);
    }
}
2
3
4
5
6
7
8
9
10
11
12
13
14
15
16
17
18
19
20
21
22
23
24
25
26
27
28
29
30
31
32
33
34
35
36
37
38
39
40
41
42
43
44
45
46
47
48
49
50
51
52
53
54
55
56
57
58
59
60
61
62
63
64
65
66
67
68
# 测试方法
@Test
    public void test3(){
        ApplicationContext applicationContext = new ClassPathXmlApplicationContext("applicationContext.xml");
        SomeService someService = applicationContext.getBean("someServiceImpl", SomeService.class);
        Person res = someService.doFirst("张迪凯",20);
        System.out.println("方法返回值:"+res);
    }
/*
============输出:
环绕通知:目标方法执行前输出时间:Mon Dec 06 17:16:55 CST 2021
方法的签名(即定义):Person com.demo.SomeService.doFirst(String,Integer)
方法的名称:doFirst
参数->张迪凯
参数->20
前置通知:在目标方法执行前输出执行时间:Mon Dec 06 17:16:55 CST 2021
执行doFirst(String name, Integer age)方法
环绕通知:目标方法执行后,提交事务
方法返回值:Person(name=张迪凯, age=20)
*/
2
3
4
5
6
7
8
9
10
11
12
13
14
15
16
17
18
19
# 5.异常通知@AfterThrowing(不常用)
/**
     * @AfterThrowing:异常通知
     * 属性:1.value:切入点表达式
     *      2.throwing:自定义的变量,表示目标方法抛出的异常对象
     *      变量名必须与通知方法的形参名一样
     * 参数:可以有最少一个最多两个参数,如果需要JoinPoint则需要放到第一个,另一个Exception类型的参数是必须的
     * 特点:
     *  1.此通知方法仅在目标方法抛出异常时执行
     *  2.此方法监控目标方法执行时是否产生异常,如果有异常,可以发送邮件、短信进行通知
     * @param exception
     */
    @AfterThrowing(value = "execution(* *..SomeServiceImpl.doSecond(..))",throwing = "exception")
    public void myAfterThrowing(Exception exception){
        System.out.println("异常通知:方法发生异常:"+exception.getMessage());
    }
2
3
4
5
6
7
8
9
10
11
12
13
14
15
# 6.最终通知@After(不常用)
/**
     * 最终方法定义
     * 1.public
     * 2.没有返回值
     * 3.方法名称自定义
     * 4.方法没有参数,如果有,可以是JoinPoint
     */

    /**
     * @After:最终通知
     *      属性:value:切入点表达式
     *      特点:
     *      1.总是会执行(有点像finally)
     *      2.在目标方法执行后执行
     */
    @After(value = "execution(* *..SomeServiceImpl.doThird(..))")
    public void myAfter(){
        System.out.println("最终通知总被执行了====");
    }
2
3
4
5
6
7
8
9
10
11
12
13
14
15
16
17
18
19
# 7.Pointcut注解
@After(value = "myPointcut()")
    public void myAfter(){
        System.out.println("最终通知总被执行了====");
    }

    /**
     * @Pointcut注解:定义和管理切入点表达式。如果项目中有多个切入点表达式是重复的
     *                则可以使用@Pointcut注解来复用此切入点表达式
     *      属性:value 切入点表达式
     *      特点:
     *          当使用@Pointcut定义在一个方法上时,此时这个方法的名称就是切入点表达式的别名
     *          其他通知中,value属性就可以使用这个方法名称作为切入点表达式
     */

    @Pointcut(value = "execution(* *..SomeServiceImpl.doThird(..))")
    private void myPointcut(){
        //无需代码
    }
2
3
4
5
6
7
8
9
10
11
12
13
14
15
16
17
18
# 8.目标类没有接口时使用cglib
@Before(value = "execution(* *..OtherService.doSome(..))")
    public void testCglib(JoinPoint joinPoint){
        System.out.println("方法的签名(即定义):"+joinPoint.getSignature());
        System.out.println("方法的名称:"+joinPoint.getSignature().getName());
        //获取方法的实参
        Object[] args = joinPoint.getArgs();
        for (Object arg : args) {
            System.out.println("参数->"+arg);
        }
        //以下是要执行的功能代码
        System.out.println("前置通知:在目标方法执行前输出执行时间:"+new Date());
    }
2
3
4
5
6
7
8
9
10
11
12
@Service
public class OtherService {
    public void doSome(String name,Integer age) {
        System.out.println("--------执行目标方法---------");
    }
}
2
3
4
5
6
@Test
    public void test4(){
        ApplicationContext applicationContext = new ClassPathXmlApplicationContext("applicationContext.xml");
        OtherService otherService = applicationContext.getBean("otherService", OtherService.class);
        System.out.println("otherService类:"+otherService.getClass().getName());
        otherService.doSome("张迪凯",20);
    }
2
3
4
5
6
7
输出: otherService类:
com.demo.OtherService$$EnhancerBySpringCGLIB$$56b82cd1方法的签名(即定义):void com.demo.OtherService.doSome(String,Integer) 方法的名称:doSome 参数->张迪凯 参数->20 前置通知:在目标方法执行前输出执行时间:Mon Dec 06 19:42:08 CST 2021 --------执行目标方法---------
# 9.目标类有接口也可以使用cglib
在applicationContext.xml中配置proxy-target-class="true"即可
<aop:aspectj-autoproxy proxy-target-class="true"/>
# spring整合mybatis
# 回忆mybatis,步骤:
- 编写实体类
- 编写核心配置文件
- 编写接口
- 编写Mapper.xml
- 测试
# 注意!!!!资源过滤器
使用此种方法时 必须配置资源过滤,否则会报错

<!--    配置过滤 防止资源导出失败-->
    <build>
        <resources>
            <resource>
                <directory>src/main/resources</directory>
                <includes>
                    <include>**/*.properties</include>
                    <include>**/*.xml</include>
                </includes>
                <filtering>true</filtering>
            </resource>
            <resource>
                <directory>src/main/java</directory>
                <includes>
                    <include>**/*.properties</include>
                    <include>**/*.xml</include>
                </includes>
                <filtering>true</filtering>
            </resource>
        </resources>
    </build>
2
3
4
5
6
7
8
9
10
11
12
13
14
15
16
17
18
19
20
21
# 步骤
# 1.导入所需依赖,并以防万一加上上述资源过滤代码
    <dependencies>
        <dependency>
            <groupId>junit</groupId>
            <artifactId>junit</artifactId>
            <version>4.11</version>
        </dependency>
        <dependency>
            <groupId>mysql</groupId>
            <artifactId>mysql-connector-java</artifactId>
            <version>5.1.47</version>
        </dependency>
        <dependency>
            <groupId>org.mybatis</groupId>
            <artifactId>mybatis</artifactId>
            <version>3.5.6</version>
        </dependency>
        <dependency>
            <groupId>org.springframework</groupId>
            <artifactId>spring-webmvc</artifactId>
            <version>5.3.5</version>
        </dependency>
        <dependency>
            <groupId>org.springframework</groupId>
            <artifactId>spring-jdbc</artifactId>
            <version>5.3.5</version>
        </dependency>
        <dependency>
            <groupId>org.aspectj</groupId>
            <artifactId>aspectjweaver</artifactId>
            <version>1.9.6</version>
        </dependency>
        <!-- https://mvnrepository.com/artifact/org.mybatis/mybatis-spring -->
        <dependency>
            <groupId>org.mybatis</groupId>
            <artifactId>mybatis-spring</artifactId>
            <version>2.0.6</version>
        </dependency>
    </dependencies>
2
3
4
5
6
7
8
9
10
11
12
13
14
15
16
17
18
19
20
21
22
23
24
25
26
27
28
29
30
31
32
33
34
35
36
37
38
# 2.编写配置文件
<?xml version="1.0" encoding="UTF8" ?>
<!--究极之恶心的 如果xml文件的第一行的 encoding=UTF-8就会报错 改成UTF8才不会报错-->
<!DOCTYPE configuration
PUBLIC "-//mybatis.org//DTD Config 3.0//EN"
"http://mybatis.org/dtd/mybatis-3-config.dtd">
<configuration>
<settings>
<setting name="logImpl" value="STDOUT_LOGGING"/>
</settings>
<typeAliases>
<package name="com.zdk.pojo"/>
</typeAliases>
<environments default="development">
<environment id="development">
<transactionManager type="JDBC"/>
<dataSource type="POOLED">
<property name="driver" value="com.mysql.jdbc.Driver"/>
<property name="url" value="jdbc:mysql://localhost:3306/mybatis?useSSL=true&useUnicode=true&characterEncoding=UTF-8&serverTimezone=UTC"/>
<property name="username" value="root"/>
<property name="password" value="root"/>
</dataSource>
</environment>
</environments>
<mappers>
<mapper class="com.zdk.mapper.UserMapper"/>
</mappers>
</configuration>
2
3
4
5
6
7
8
9
10
11
12
13
14
15
16
17
18
19
20
21
22
23
24
25
26
27
28
# 3.编写接口
public interface UserMapper {
    List<User> getUserList();
}
2
3
# 4.编写Mapper.xml文件
<?xml version="1.0" encoding="UTF8" ?>
<!DOCTYPE mapper
        PUBLIC "-//mybatis.org//DTD Mapper 3.0//EN"
        "http://mybatis.org/dtd/mybatis-3-mapper.dtd">
<!--namespace绑定一个对应的Dao/Mapper接口-->
<mapper namespace="com.zdk.mapper.UserMapper">
    <select id="getUserList" resultType="user">
        select * from user ;
    </select>
</mapper>
2
3
4
5
6
7
8
9
10
# 测试前可以写一个工具类,用于获取sqlSession
public class MybatisUtil {
    private static SqlSessionFactory sqlSessionFactory;
    public static SqlSession getSqlSession() throws IOException {
        String resource="mybatis-config.xml";
        InputStream in =Resources.getResourceAsStream(resource);
        sqlSessionFactory=new SqlSessionFactoryBuilder().build(in);
        //设置为自动提交事务
        return sqlSessionFactory.openSession(true);
    }
}
2
3
4
5
6
7
8
9
10
# 5.测试
public class MyTest {
    @Test
    public void getUserListTest() throws IOException {
        SqlSession sqlSession = MybatisUtil.getSqlSession();
        UserMapper mapper = sqlSession.getMapper(UserMapper.class);
        List<User> userList = mapper.getUserList();
        for (User user : userList) {
            System.out.println(user);
        }
    }
}
2
3
4
5
6
7
8
9
10
11
# spring整合mybatis
# 步骤
- 加入依赖
- spring依赖
- mybatis依赖
- mysql驱动
- spring的事务的依赖
- mybatis和spring的集成的依赖:mybatis官方推荐使用的,用来在spring项目中创建mybatis的SqlSessionFactory、dao对象
- 创建实体类和新建数据库表
- 创建dao接口和mapper文件
- 创建mybatis主配置文件
- 创建Service接口和实现类,属性是dao
- 创建spring的配置文件:声明mybatis的对象交给spring创建和管理
- 数据源
- SQLSessionFactory
- Dao对象
- 声明自定义的service
- 创建测试类,获取service对象,通过service调dao完成数据访问
# 注意,xml文件出现字节的 UTF-8 序列的字节 1无效错误时的解决方案
- 在pom.xml文件中的build标签下添加以下属性
<plugins>
    <plugin>
        <groupId>org.apache.maven.plugins</groupId>
        <artifactId>maven-resources-plugin</artifactId>
        <configuration>
            <encoding>UTF-8</encoding>
        </configuration>
    </plugin>
</plugins>
2
3
4
5
6
7
8
9
- 在pom.xml文件中的build标签下的resources标签下添加以下resource
<resource>
    <directory>src/main/resources</directory>
        <includes>
            <include>**/*.properties</include>
            <include>**/*.xml</include>
        </includes>
    <filtering>true</filtering>
</resource>
2
3
4
5
6
7
8
- 添加完以上两个东西 运行才不会报错
# 方式一:
- 编写数据源配置
<?xml version="1.0" encoding="UTF-8"?>
<beans xmlns="http://www.springframework.org/schema/beans"
xmlns:xsi="http://www.w3.org/2001/XMLSchema-instance"
xmlns:context="http://www.springframework.org/schema/context"
xmlns:jdbc="http://www.springframework.org/schema/jdbc"
xsi:schemaLocation="http://www.springframework.org/schema/beans
https://www.springframework.org/schema/beans/spring-beans.xsd
http://www.springframework.org/schema/context
https://www.springframework.org/schema/context/spring-context.xsd
http://www.springframework.org/schema/jdbc
http://www.springframework.org/schema/jdbc/spring-jdbc.xsd">
<!-- DataSource:使用spring提供的数据替换mybatis的配置
这里使用spring提供的jdbc:org.springframework.jdbc.datasource.DriverManagerDataSource
-->
<bean id="dataSource" class="org.springframework.jdbc.datasource.DriverManagerDataSource">
<property name="driverClassName" value="com.mysql.jdbc.Driver"/>
<property name="url" value="jdbc:mysql://localhost:3306/mybatis?useSSL=true&useUnicode=true&characterEncoding=UTF-8&serverTimezone=UTC"/>
<property name="username" value="root"/>
<property name="password" value="root"/>
</bean>
<!-- spring-dao.xml专注于数据库的设置 不再改变-->
</beans>
2
3
4
5
6
7
8
9
10
11
12
13
14
15
16
17
18
19
20
21
22
23
24
25
26
- sqlSessionFactory
<!--    SqlSessionFactory-->
    <bean id="sqlSessionFactory" class="org.mybatis.spring.SqlSessionFactoryBean">
        <property name="dataSource" ref="dataSource"/>
        <!--        绑定mybatis配置文件-->
        <property name="configLocation" value="mybatis-config.xml"/>
        <property name="mapperLocations" value="com/zdk/mapper/*.xml"/>
    </bean>
2
3
4
5
6
7
- sqlSessionTemple
<bean id="sqlSession" class="org.mybatis.spring.SqlSessionTemplate">
        <!--        只能使用构造器注入sqlSession,因为上面这个类没有set方法-->
        <constructor-arg index="0" ref="sqlSessionFactory"/>
    </bean>
2
3
4
- 需要给接口增加实现类
public class UserMapperImpl implements UserMapper{
    //纯mybatis时的所有操作,都使用sqlSession执行,现在使用SqlSessionTemplate;

    private SqlSessionTemplate sqlSession;
    public void setSqlSession(SqlSessionTemplate sqlSession) {
        this.sqlSession = sqlSession;
    }

    @Override
    public List<User> getUserList() {
        UserMapper mapper = sqlSession.getMapper(UserMapper.class);
        return mapper.getUserList();
    }
}
2
3
4
5
6
7
8
9
10
11
12
13
14
- 将自己写的实现类注入到spring中
<?xml version="1.0" encoding="UTF-8"?>
<beans xmlns="http://www.springframework.org/schema/beans"
       xmlns:xsi="http://www.w3.org/2001/XMLSchema-instance"
       xmlns:aop="http://www.springframework.org/schema/aop"
       xmlns:jdbc="http://www.springframework.org/schema/jdbc"
       xsi:schemaLocation="http://www.springframework.org/schema/beans
        https://www.springframework.org/schema/beans/spring-beans.xsd


        http://www.springframework.org/schema/aop
        https://www.springframework.org/schema/aop/spring-aop.xsd
        http://www.springframework.org/schema/jdbc
        http://www.springframework.org/schema/jdbc/spring-jdbc.xsd">
<!--    此applicationContext.xml配置文件专注于配置bean就可
        spring-dao.xml专注于数据库的设置,不再改变
-->

    <import resource="spring-dao.xml"/>

    <bean id="userMapper" class="com.zdk.mapper.UserMapperImpl">
        <property name="sqlSession" ref="sqlSession"/>
    </bean>
</beans>
2
3
4
5
6
7
8
9
10
11
12
13
14
15
16
17
18
19
20
21
22
23
- 测试使用
public class MyTest {
    //方式一
    @Test
    public void getUserListTest() throws IOException {
        ApplicationContext context = new ClassPathXmlApplicationContext("applicationContext.xml");
        UserMapper userMapper = context.getBean("userMapper", UserMapperImpl.class);
        List<User> userList = userMapper.getUserList();
        for (User user : userList) {
            System.out.println(user);
        }
    }
}
2
3
4
5
6
7
8
9
10
11
12
# 方式二:
- 基本步骤同上,但简化了获取sqlSession的操作
<bean id="userMapper2" class="com.zdk.mapper.UserMapperImpl2">
        <property name="sqlSessionFactory" ref="sqlSessionFactory"/>
</bean>
2
3
- 将接口的实现类继承SqlSessionDaoSupport类,通过getSqlSession()方法获取sqlSession
public class UserMapperImpl2 extends SqlSessionDaoSupport implements UserMapper {
    @Override
    public List<User> getUserList() {
        SqlSession sqlSession = getSqlSession();
        UserMapper mapper = sqlSession.getMapper(UserMapper.class);
        return mapper.getUserList();
    }
}
2
3
4
5
6
7
8
- 测试
public class MyTest {
    //方式二
    @Test
    public void getUserListTest2() throws IOException {
        ApplicationContext context = new ClassPathXmlApplicationContext("applicationContext.xml");
        UserMapper userMapper = context.getBean("userMapper2", UserMapperImpl2.class);
        List<User> userList = userMapper.getUserList();
        for (User user : userList) {
            System.out.println(user);
        }
    }
}
2
3
4
5
6
7
8
9
10
11
12
# 方式三(推荐使用):
mybatis-config.xml配置文件
<?xml version="1.0" encoding="UTF8" ?>
<!--究极之恶心的  如果xml文件的第一行的 encoding=UTF-8就会报错   改成UTF8才不会报错-->
<!DOCTYPE configuration
        PUBLIC "-//mybatis.org//DTD Config 3.0//EN"
        "http://mybatis.org/dtd/mybatis-3-config.dtd">
<configuration>
    <settings>
        <setting name="logImpl" value="STDOUT_LOGGING"/>
    </settings>
    <typeAliases>
        <package name="com.zdk.pojo"/>
    </typeAliases>
</configuration>
1
2
3
4
5
6
7
8
9
10
11
12
13spring-dao.xml配置文件
<?xml version="1.0" encoding="UTF-8"?> <beans xmlns="http://www.springframework.org/schema/beans" xmlns:xsi="http://www.w3.org/2001/XMLSchema-instance" xmlns:jdbc="http://www.springframework.org/schema/jdbc" xmlns:context="http://www.springframework.org/schema/context" xsi:schemaLocation="http://www.springframework.org/schema/beans https://www.springframework.org/schema/beans/spring-beans.xsd http://www.springframework.org/schema/jdbc http://www.springframework.org/schema/jdbc/spring-jdbc.xsd http://www.springframework.org/schema/context https://www.springframework.org/schema/context/spring-context.xsd"> <!-- DataSource:使用spring提供的数据替换mybatis的配置 这里使用spring提供的jdbc:org.springframework.jdbc.datasource.DriverManagerDataSource --> <!-- <bean id="dataSource" class="org.springframework.jdbc.datasource.DriverManagerDataSource">--> <!-- <property name="driverClassName" value="com.mysql.cj.jdbc.Driver"/>--> <!-- <property name="url" value="jdbc:mysql://localhost:3306/mybatis?useSSL=true&useUnicode=true&characterEncoding=UTF-8&serverTimezone=UTC"/>--> <!-- <property name="username" value="root"/>--> <!-- <property name="password" value="root"/>--> <!-- </bean>--> <!-- 指定配置文件路径--> <context:property-placeholder location="db.properties"/> <bean id="dataSource" class="org.springframework.jdbc.datasource.DriverManagerDataSource"> <property name="driverClassName" value="${jdbc.driver}"/> <property name="url" value="${jdbc.url}"/> <property name="username" value="${jdbc.username}"/> <property name="password" value="${jdbc.password}"/> </bean> <!-- SqlSessionFactory--> <bean id="sqlSessionFactory" class="org.mybatis.spring.SqlSessionFactoryBean"> <property name="dataSource" ref="dataSource"/> <!-- 绑定mybatis配置文件--> <property name="configLocation" value="mybatis-config.xml"/> <property name="mapperLocations" value="com/zdk/mapper/*.xml"/> </bean> <bean id="sqlSession" class="org.mybatis.spring.SqlSessionTemplate"> <!-- 只能使用构造器注入sqlSession,因为上面这个类没有set方法--> <constructor-arg index="0" ref="sqlSessionFactory"/> </bean> <!-- 创建dao/mapper对象,使用SqlSession的getMapper(xxxDao/Mapper.class) MapperScannerConfigurer:在内部调用getMapper()生成每个dao接口的代理对象 --> <bean class="org.mybatis.spring.mapper.MapperScannerConfigurer"> <property name="sqlSessionFactoryBeanName" value="sqlSessionFactory"/> <!-- 指定包名,包名是Dao/Mapper接口所在的包名 MapperScannerConfigurer会扫描这个包中的所有接口,把每个接口都执行一次getMapper()方法, 得到每个接口的Dao/Mapper对象,创建好的对象会被加入到Spring容器中进行管理 --> <property name="basePackage" value="com.zdk.mapper"/> </bean> <!-- spring-dao.xml专注于数据库的设置 不再改变--> </beans>1
2
3
4
5
6
7
8
9
10
11
12
13
14
15
16
17
18
19
20
21
22
23
24
25
26
27
28
29
30
31
32
33
34
35
36
37
38
39
40
41
42
43
44
45
46
47
48
49
50
51
52
53
54
55
56
57
58重点在与这个bean:
MapperScannerConfigurer的配置它可以让我们不用去手动实现Dao/Mapper接口。它扫描basePackage下的Dao/Mapper接口并通过代理实现这些接口,将生成的代理类bean注入到Spring容器中,bean的默认名称为Dao/Mapper名字的首字母小写名
# PS
ps1:
Spring和mybatis整合后,执行SQL的事务是自动提交的,无需再添加代码 SqlSession.commit();
ps2:
要将数据库配置信息放到别的properties文件中然后通过此种方式使用时需要注意:
jdbc.driver=com.mysql.cj.jdbc.Driver
jdbc.url=jdbc:mysql://localhost:3306/mybatis?serverTimezone=UTC&useSSL=false&useUnicode=true&characterEncoding=utf8
jdbc.username=root
jdbc.password=root
1
2
3
4<context:property-placeholder location="db.properties"/> <bean id="dataSource" class="org.springframework.jdbc.datasource.DriverManagerDataSource"> <property name="driverClassName" value="${jdbc.driver}"/> <property name="url" value="${jdbc.url}"/> <property name="username" value="${jdbc.username}"/> <property name="password" value="${jdbc.password}"/> </bean>1
2
3
4
5
6
7因为使用的是Spring自带的数据源,默认的properties文件的属性必须带有前缀
jdbc.,否则会获取不到连接!
# Spring事务
# 回顾事务
- 一组操作当成一个事务,要么都成功,要么都失败
- 确保数据的完整性和一致性
# 事务的ACID原则
- 原子性
- 一致性
- 隔离性:多个业务操作同一个资源时要保证隔离性,防止数据损坏
- 持久性:事务一旦提交,无论系统发生什么问题,结果都不会再被影响,被持久化的写入到存储器中
# spring中的事务管理
- 声明式事务:AOP
- 编程式事务:需要在代码中进行管理
spring控制事务一般会放在service类的业务方法上,因为业务方法可能会调用多个dao方法,执行多条insert、update、delete语句
需要在Spring中注入一个
xxxDataSourceTransactionManager(使用的数据库访问技术(框架)的事务管理器的实现类)类来通知Spring我们使用的是哪一种数据库访问技术(框架),这样Spring就可以根据数据库访问技术(框架)创建其对应的事务处理类并注入容器中例如:
    <bean id="transactionManager" class="org.springframework.jdbc.datasource.DataSourceTransactionManager">
        <property name="dataSource" ref="dataSource"/>
    </bean>
1
2
3
# 五个事务隔离级别常量(掌握默认)
这些常量均是以ISOLATION_开头。形如:ISOLATION_XXX
ISOLATION_DEFAULT:采用DB默认的事务隔离级别。MySQL的默认为REPEATABLE_READ;Oracle默认为READ_COMMITTED- ISOLATION_READ_UNCOMMITTED:读未提交。未解决任何并发问题。
- ISOLATION_READ_COMMITTED:读已提交。解决脏读,存在不可重复读与幻读。
- ISOLATION_REPEATABLE_READ:可重复读。解决脏读、不可重复读,存在幻读
- ISOLATION_SERIALIZABLE:串行化。不存在并发问题
# 事务的超时时间
事务的超时时间表示一个方法(事务)最长的执行时间,如果事务执行超过了这个时间,事务就会回滚。单位是秒,整数值,默认-1
# 事务的传播行为
事务的传播行为用来控制业务方法是否有事务、是什么样的事务
# 七个事务传播行为常量(主要掌握三个)
所谓事务传播行为是指,处于不同事务中的方法在相互调用时,执行期间事务的维护情况。如,A事务中的方法doSome()调用B事务中的方法doOther(),在调用执行期间事务的维护情况,就称为事务传播行为。事务传播行为是加在方法上的。
事务传播行为常量都是以PROPAGATION_(propagation 传播),形如PROPAGATION_XXX
PROPAGATION_REQUIRED指定的方法必须在事务内执行。若当前存在事务,就加入到当前事务中;若当前没有事务,则创建一个新事务。这种传播行为是最常见的选择,也是Spring默认的事务传播行为
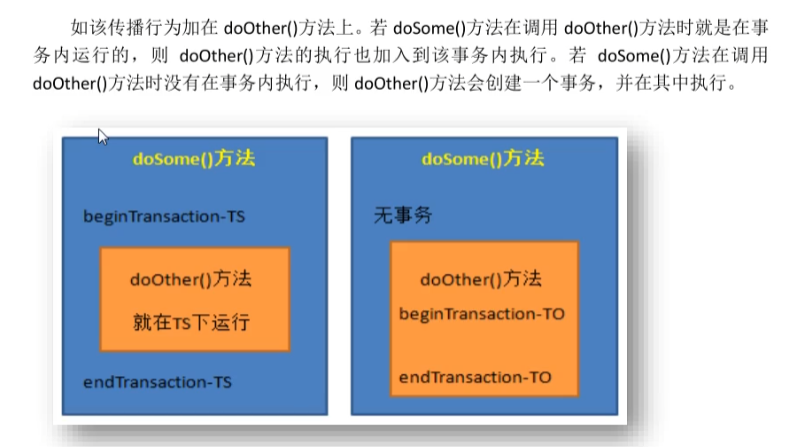
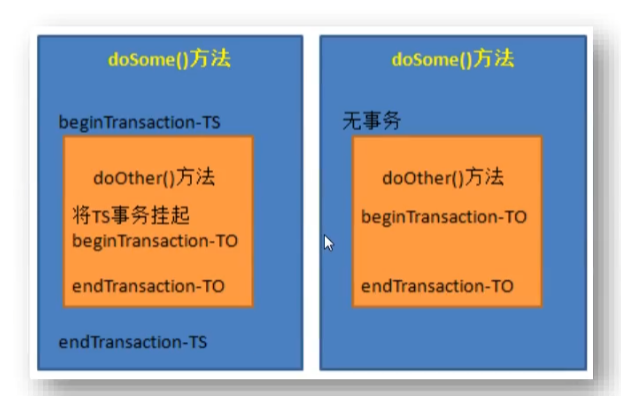
PROPAGATION_REQUIRES_NEW总是创建一个事务,若存在当前事务,就将当前事务挂起,直到新事务执行完毕。
下图中左图会将doOther()方法执行完后才继续执行doSome()
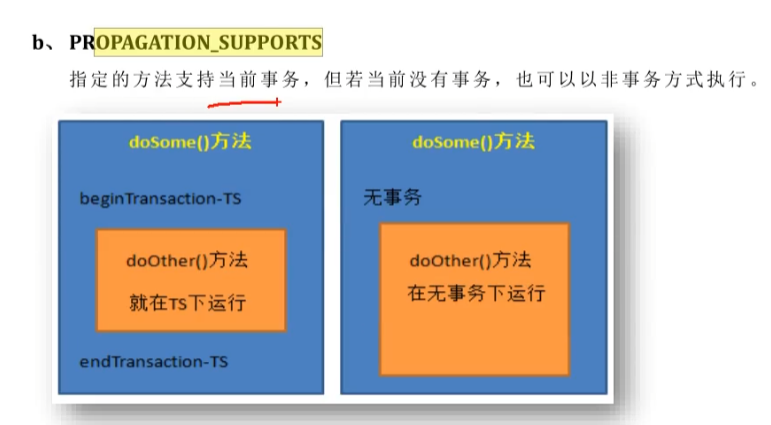
PROPAGATION_SUPPORTS指定的方法支持当前事务,但若当前没有事务,也可以以非事务方式执行(查询操作)
PROPAGATION_MANDATORY
PROPAGATION_NESTED
PROPAGATION_NEVER
PROPAGATION_NOT_SUPPORTED
# Spring提交事务、回滚事务的时机
当业务方法执行成功,没有异常抛出,当方法执行完毕后,Spring将提交事务,调用事务管理器的commit方法
当业务方法抛出运行时异常或ERROR,Spring执行回滚,调用事务管理器的rollback方法
运行时异常的定义:RuntimeException和它的子类都是运行时异常,例如NullPointException、NumberFormatException
当业务方法抛出非运行时异常(主要是受查异常)时,不会回滚,而是会提交事务。
受查异常:在编码时必须处理的异常。例如IOException、SQLException
# 总结Spring事务
- 管理事务的是事务管理接口和它的实现类
- Spring的事务是一个统一模型
- 指定要使用的事务管理器实现类
- 指定哪些类、哪些方法需要加入事务的功能
- 指定方法需要的隔离级别、传播行为、(超时时间)
# Spring框架中提供的事务处理方法
注解方式:适合中小项目使用。
Spring框架自己用aop实现给业务方法增加事务的功能,使用@Transactional注解增加事务。Transactional注解是Spring框架自己注解,放在public方法的上面,表示当前方法具有事务,可以给注解的属性赋值,表示具体的隔离级别、传播行为、异常信息
@Transactional的所有可选属性:propagation:用于设置事务的传播属性,该属性类型为Propagation枚举,默认值为Propagation.REQUIREDisolation:用于设置事务的隔离级别。该属性类型为Isolation枚举,默认值为Isolation.DEFAULTreadOnly:用于设置该方法对数据库的操作是否是只读的。该属性为boolean,默认值为falsetimeout:用于设置本操作与数据库连接的超时时限。单位为秒,类型为int,默认值为-1,即没有时限rollbackFor:指定需要回滚的异常类。类型为Class[],默认值为空数组。当然,若只有一个异常类时,可以不使用数组。- 处理逻辑:Spring首先会检查方法抛出的异常是不是在该注解的属性值中,如果在属性数组中,不管是什么类型的异常,一定会回滚
- 如果抛出的异常不在@rollbackFor的属性值中,Spring会判断该异常是不是RuntimeException,如果是,则会回滚,如果不是,不会回滚
rollbackForClassName:指定需要回滚的异常类类名。类型为String[],默认值为空数组,若只有一个异常类名时,可以不使用数组。noRollbackForClass:指定不需要回滚的异常类。类型为Class[],默认值为空数组。当然,若只有一个异常类时,可以不使用数组。noRollbackForClassName:指定不需要回滚的异常类类名。类型为String[],默认值为空数组,若只有一个异常类名时,可以不使用数组。
# 使用@Transactional注解的步骤
需要声明事务管理器对象
<bean id="transactionManager" class="org.springframework.jdbc.datasource.DataSourceTransactionManager">
     <property name="dataSource" ref="dataSource"/>
 </bean>
1
2
3开启事务注解驱动,告诉Spring要使用注解的方式管理事务。
Spring就会使用aop机制,创建@Transactional所在类的代理对象,给方法加入事务的功能Spring给方法加入业务的方式:
在业务方法执行前先开启事务,在业务方法之后提交或回滚事务,使用的是SpringAop中的环绕通知
@Around()
Object myAround(){
    Spring开启事务
    try{
        执行业务方法
        Spring的事务管理器.commit()
    }catch(Exception e){
        Spring的事务管理器.rollback()
    }
}
1
2
3
4
5
6
7
8
9
10
# 步骤
- 导入需要的命令,aop,tx,jdbc等
xmlns:xsi="http://www.w3.org/2001/XMLSchema-instance"
       xmlns:context="http://www.springframework.org/schema/context"
       xmlns:aop="http://www.springframework.org/schema/aop"
       xmlns:jdbc="http://www.springframework.org/schema/jdbc"
       xmlns:tx="http://www.springframework.org/schema/tx"
       xsi:schemaLocation="http://www.springframework.org/schema/beans
       https://www.springframework.org/schema/beans/spring-beans.xsd
       http://www.springframework.org/schema/context
       https://www.springframework.org/schema/context/spring-context.xsd
       http://www.springframework.org/schema/aop
       https://www.springframework.org/schema/aop/spring-aop.xsd
       http://www.springframework.org/schema/tx
       https://www.springframework.org/schema/tx/spring-tx.xsd
       http://www.springframework.org/schema/jdbc
       http://www.springframework.org/schema/jdbc/spring-jdbc.xsd">
2
3
4
5
6
7
8
9
10
11
12
13
14
15
- 在spring-dao.xml文件中配置
<!--    配置声明式事务-->
    <bean id="transactionManager" class="org.springframework.jdbc.datasource.DataSourceTransactionManager">
        <property name="dataSource" ref="dataSource"/>
    </bean>

<!--    结合AOP实现事务的织入-->

    <!--    配置事务通知-->
    <tx:advice id="txAdvice" transaction-manager="transactionManager">
<!--        给哪些方法配置事务-->
<!--        配置事务的传播特性:propagation,默认是REQUIRED-->
        <tx:attributes>
            <tx:method name="add" propagation="REQUIRED"/>
            <tx:method name="delete" propagation="REQUIRED"/>
            <tx:method name="update" propagation="REQUIRED"/>
            <tx:method name="select" read-only="true"/>
            <tx:method name="*" propagation="REQUIRED"/>
        </tx:attributes>
    </tx:advice>

<!--    配置事务切入-->
    <aop:config>
<!--        切入点:表达式表示mapper包下的所有类的所有方法,..是参数-->
        <aop:pointcut id="txPointCut" expression="execution(* com.zdk.mapper.*.*(..))"/>
        <aop:advisor advice-ref="txAdvice" pointcut-ref="txPointCut"/>
    </aop:config>
2
3
4
5
6
7
8
9
10
11
12
13
14
15
16
17
18
19
20
21
22
23
24
25
26
- 测试
@Override
    public class MyTest{
    @Override
    public List<User> getUserList() {
        UserMapper mapper = getSqlSession().getMapper(UserMapper.class);
        User user=new User(6, "张振明","11111111");
        mapper.addUser(user);
        //让删除时sql语句错误,看配置声明式事务后add操作是否会被执行
        mapper.deleteUser(6);
        return mapper.getUserList();
    }
}
2
3
4
5
6
7
8
9
10
11
12