Stream
Table of Contents generated with DocToc (opens new window)
# Stream
# 消息驱动概述
# 是什么
一句话:屏蔽底层消息中间件的差异,降低切换成本,统一消息的变成模型
网站:
- https://spring.io/projects/spring-cloud-stream#overview
- https://docs.spring.io/spring-cloud-stream/docs/current/reference/html/
- Spring Cloud Stream中文指导手册:https://m.wang1314.com/doc/webapp/topic/20971999.html
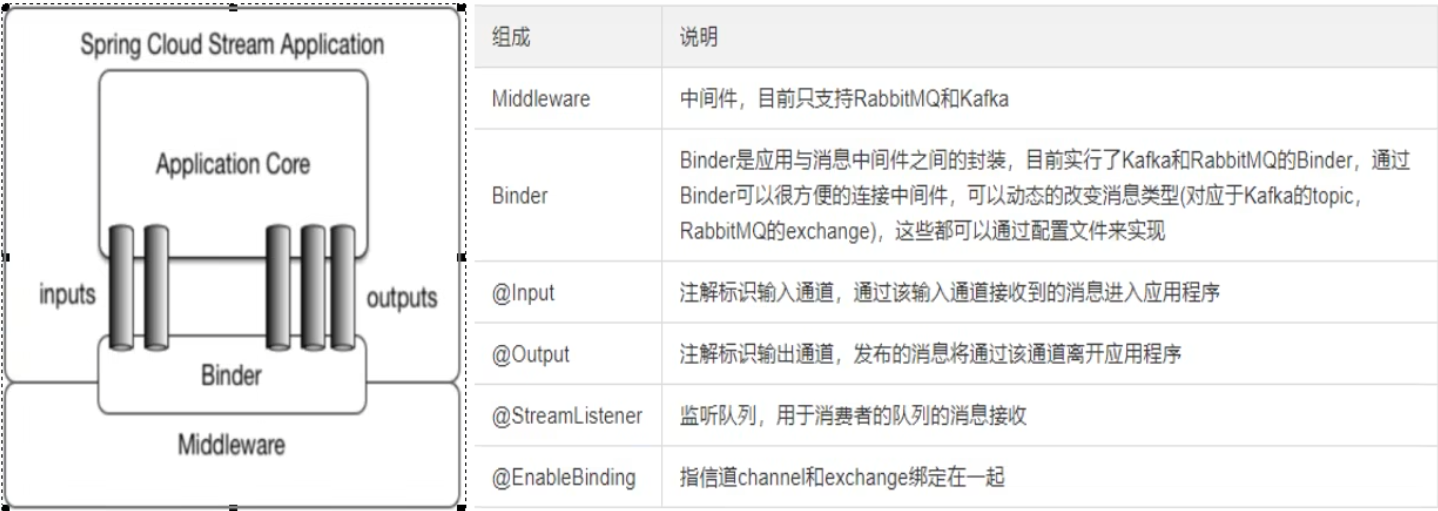
什么是Spring Cloud Stream
官方定义Spring Cloud Stream是一个构建消息驱动微服务的框架
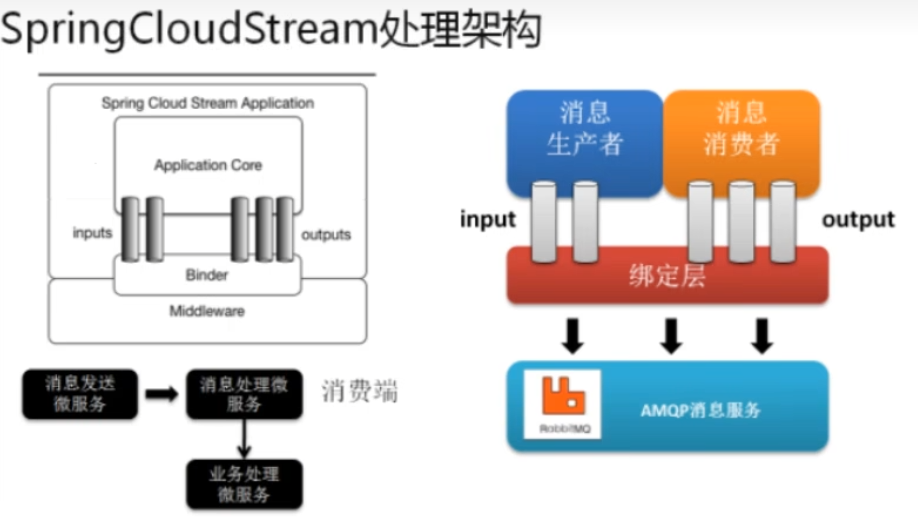
应用程序通过inputs或者 outputs来与Spring Cloud Stream中binder对象交互。 通过我们配置来binding(绑定),而Spring Cloud Stream的 binder对象负责与消息中间件交互。
所以,我们只需要搞清楚如何与Spring Cloud Stream交互就可以方便使用消息驱动的方式。
通过使用Spring Integration来连接消息代理中间件以实现消息事件驱动。 Spring Cloud Stream为一些供应商的消息中间件产品提供了个性化的自动化配置实现,引用了发布-订阅、消费组、分区的三个核心概念。
# 设计思想
# 标准MQ
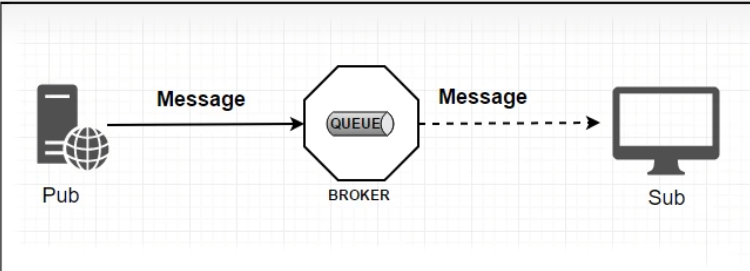
- 生产者/消费者之间靠
消息媒介传递信息内容——Message - 消息必须走特定的
通道——消息通道MessageChannel - 消息通道里的消息如何被消费呢,谁负责收发
处理——消息通道MessageChannel的子接口SubscribableChannel,由MessageHandler消息处理器所订阅
# 为什么用Cloud Stream
比方说我们用到了RabbitMQ和Kafka,由于这两个消息中间件的架构上的不同,像RabbitMQ有exchange,Kafka有Topic和Partitions分区,
这些中间件的差异性导致我们实际项目开发给我们造成了一定的困扰,我们如果用了两个消息队列的其中一种,后面的业务需求,想往另外一种消息队列进行迁移,这时候无疑就是一个灾难性的,一大堆东西都要重新推倒重新做,因为它跟我们的系统耦合了,这时候Spring Cloud Stream给我们提供了一种解耦合的方式。
# stream为什么可以统一底层差异?
通过定义绑定器Binder作为中间层,实现了应用程序与消息中间件的细节之间的隔离在没有绑定器这个概念的情况下,我们的Spring Boot应用要直接与消息中间件进行信息交互的时候,由于各消息中间件构建的初衷不同,它们的实现细节上会有较大的差异性 通过定义绑定器作为中间层,完美地实现了应用程序与消息中间件细节之间的隔离。 通过向应用程序暴露统一的
Channel通道,使得应用程序不需要再考虑各种不同的消息中间件实现。
# Binder
- INPUT对应消费者
- OUTPUT对应生产者
Stream对消息中间件的进一步封装,可以做到代码层面对中间件无感知,甚至于可以动态切换中间件(RabbitMQ切换为Kafka),使得微服务的开发高度解耦,服务可以更多关注自己的业务流程
# Stream中的消息通信方式遵循了发布订阅模式
主要是通过Topic主题进行广播:
- 在RabbitMQ中就是Exchange
- 在Kafka中就是Topic
# SpringCloud Stream标准流程套路
大致模型:
# Binder
- 很方便地连接中间件,屏蔽底层差异
# Channel
- 通道,是队列Queue的一种抽象,在消息通讯系统中就是实现存储和转发消息的媒介,通过Channel可以对队列进行配置
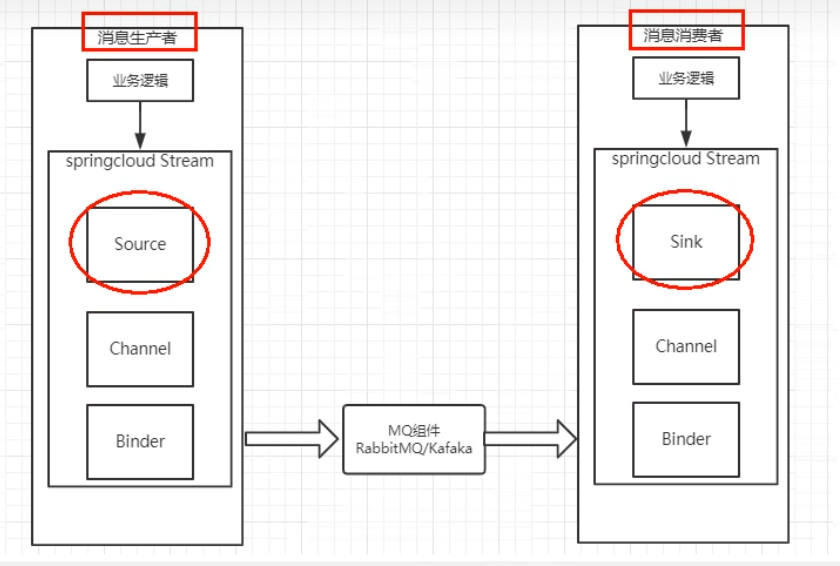
# Source和Sink
- 简单的可以理解为参照对象是Spring Cloud Stream自身,从Stream发布消息就是输出,接受消息就是输入
# 编码API和常用注解
# 案例说明
RabbitMQ环境已OK
下面需要新建三个子模块:
- cloud-stream-rabbitmq-provider8801,作为生产者发消息模块
- cloud-stream-rabbitmq-consumer8802,作为消息接收模块
- cloud-stream-rabbitmq-consumer8803 作为消息接收模块
# 消息驱动之生产者
新建cloud-stream-rabbitmq-provider8801模块
# pom
<dependencies>
    <!--        通用的依赖-->
    <dependency>
        <groupId>com.zdk</groupId>
        <artifactId>cloud-api-commons</artifactId>
        <version>${project.version}</version>
    </dependency>
    <dependency>
        <groupId>org.springframework.boot</groupId>
        <artifactId>spring-boot-starter-web</artifactId>
    </dependency>
    <dependency>
        <groupId>org.springframework.boot</groupId>
        <artifactId>spring-boot-starter-actuator</artifactId>
    </dependency>
    <dependency>
        <groupId>org.projectlombok</groupId>
        <artifactId>lombok</artifactId>
        <optional>true</optional>
    </dependency>
    <dependency>
        <groupId>org.springframework.boot</groupId>
        <artifactId>spring-boot-starter-test</artifactId>
        <scope>test</scope>
    </dependency>
    <!-- eureka 客户端添加的依赖 -->
    <dependency>
        <groupId>org.springframework.cloud</groupId>
        <artifactId>spring-cloud-starter-netflix-eureka-client</artifactId>
    </dependency>
    <dependency>
        <groupId>org.springframework.cloud</groupId>
        <artifactId>spring-cloud-starter-stream-rabbit</artifactId>
    </dependency>
</dependencies>
2
3
4
5
6
7
8
9
10
11
12
13
14
15
16
17
18
19
20
21
22
23
24
25
26
27
28
29
30
31
32
33
34
35
新增stream-rabbit依赖即可,web、actuator等依赖照旧
# yaml
server:
  port: 8801

spring:
  application:
    name: cloud-stream-provider
  # 再配置一下 防止健康检查报错
  rabbitmq:
    host: 106.55.240.216
    port: 5672
    username: admin
    password: 123456
  cloud:
    stream:
      binders: # 在此处配置要绑定的rabbitma的服务信息
        defaultRabbit: # 表示定义binder的名称 用于binding整合
          type: rabbit # 消息组件类型
          environment: # 设置rabbitmq的相关环境配置
            spring:
              rabbitmq:
                host: 106.55.240.216
                port: 5672
                username: admin
                password: 123456

      bindings: # 服务的整合处理
        output: # 这个名字是一个通道的名称
          destination: studyExchange # 表示要使用的Exchange的名称
          content-type: application/json # 设置消息类型,本次为json,文本则设置为"text/plain"
          binder: defaultRabbit # 设置要绑定的Binder消息服务的名称 和上面的一致,否则报错

eureka:
  client:
    service-url:
      defaultZone: http://localhost:7001/eureka/
  instance:
    lease-renewal-interval-in-seconds: 2 #设置心跳时间间隔
    lease-expiration-duration-in-seconds: 5
    instance-id: send-8801.com #在消息列表显示主机名称
    prefer-ip-address: true #显示ip地址
2
3
4
5
6
7
8
9
10
11
12
13
14
15
16
17
18
19
20
21
22
23
24
25
26
27
28
29
30
31
32
33
34
35
36
37
38
39
40
41
# 启动类
@EnableDiscoveryClient
@SpringBootApplication
public class StreamMQMain8801{
    public static void main(String[] args){
        SpringApplication.run(StreamMQMain8801.class,args);
    }
}
2
3
4
5
6
7
# 业务类
public interface IMessageProvider {
    /**
     * 发消息接口
     * @return
     */
    String send();
}
2
3
4
5
6
7
package com.zdk.springcloud.service.impl;
import cn.hutool.core.util.IdUtil;
import com.zdk.springcloud.service.IMessageProvider;
import org.springframework.cloud.stream.annotation.EnableBinding;
import org.springframework.cloud.stream.messaging.Source;
import org.springframework.integration.support.MessageBuilder;
import org.springframework.messaging.MessageChannel;
import javax.annotation.Resource;
/**
* @Description
* @Author zdk
* @Date 2022/11/14 16:56
* @EnableBinding(value = Source.class) 标志这个类是消息源,即发送者
*/
@EnableBinding(value = Source.class)
public class MessageProviderImpl implements IMessageProvider {
@Resource
private MessageChannel output;
@Override
public String send() {
String serial = IdUtil.simpleUUID();
// 这里要注意MessageBuilder的包
output.send(MessageBuilder.withPayload(serial).build());
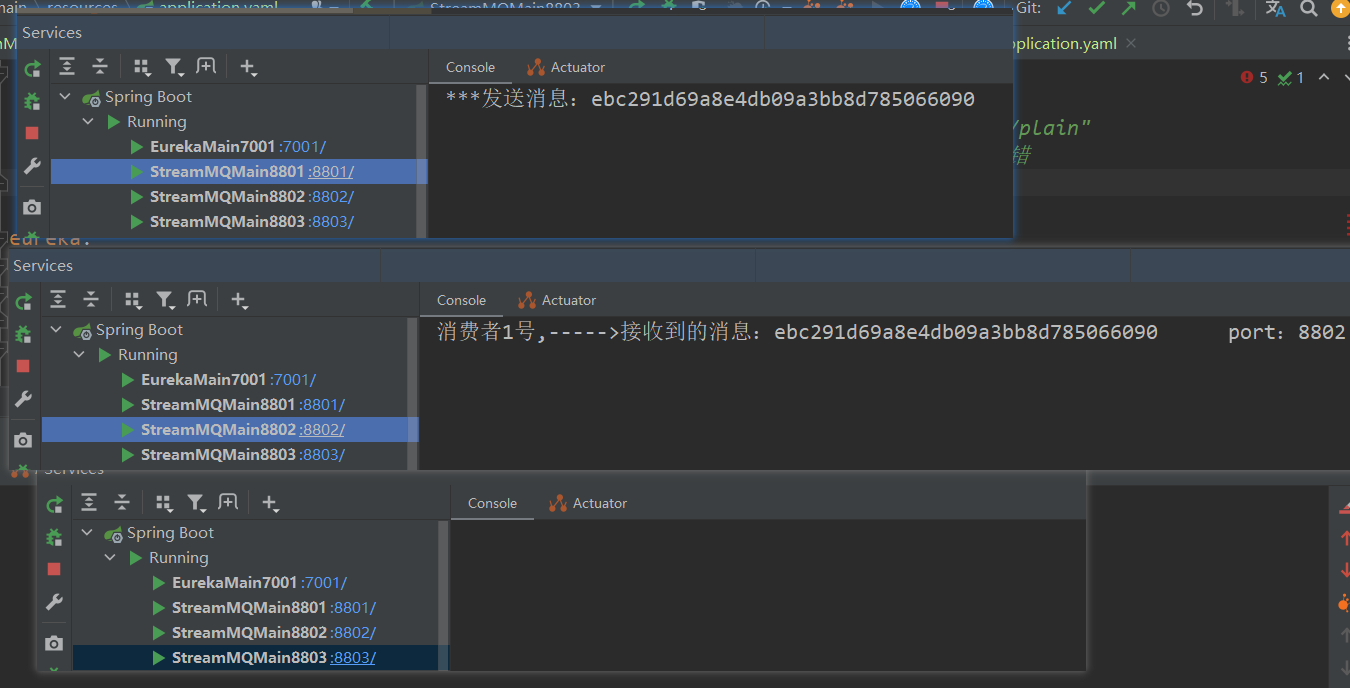
System.out.println("***发送消息:"+serial);
return serial;
}
}
2
3
4
5
6
7
8
9
10
11
12
13
14
15
16
17
18
19
20
21
22
23
24
25
26
27
28
29
30
31
32
@RestController
public class SendMessageController {

    @Resource
    private IMessageProvider messageProvider;

    @GetMapping(value = "/sendMessage")
    public String sendMessage(){
        return messageProvider.send();
    }
}
2
3
4
5
6
7
8
9
10
11
# 测试
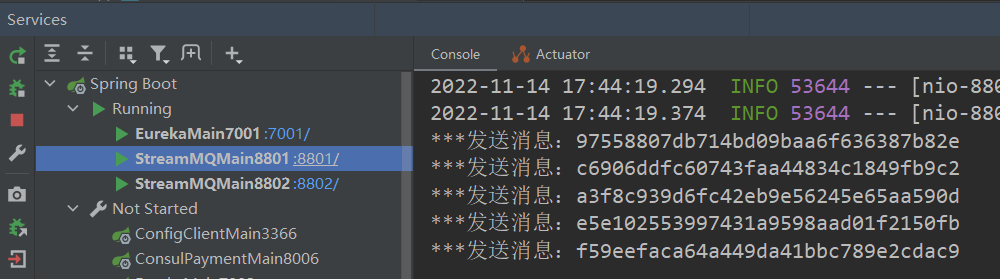
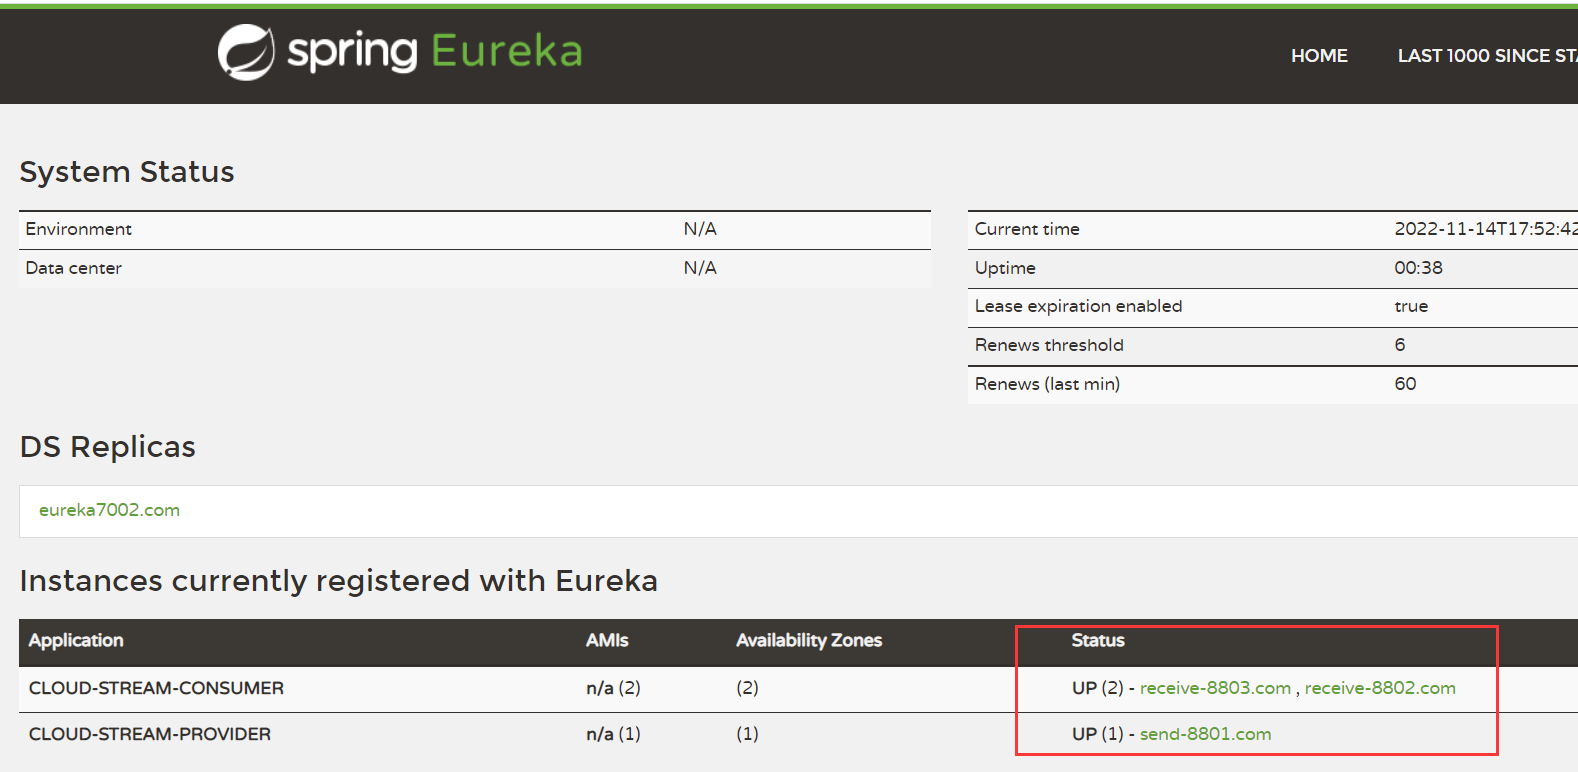
- 启动7001Eureka
- 保证RabbitMQ服务正常
- 启动8801Provider
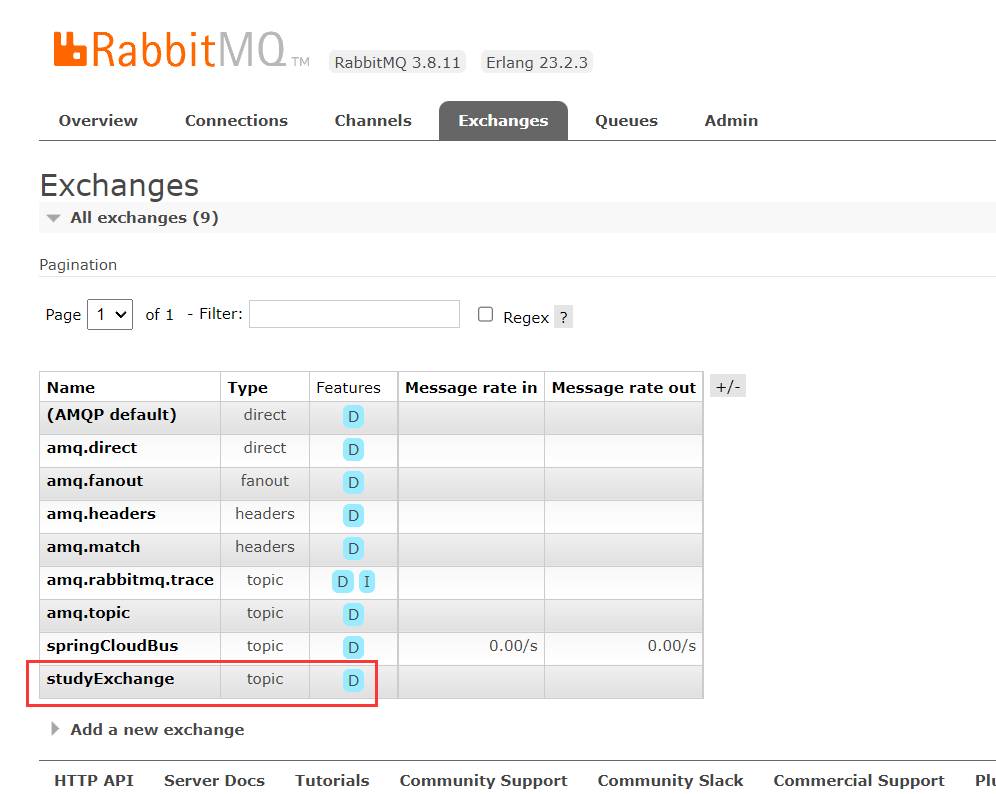
成功启动后可以发现,RabbitMQ中出现了我们yaml中配置的名为studyExchange的交换机
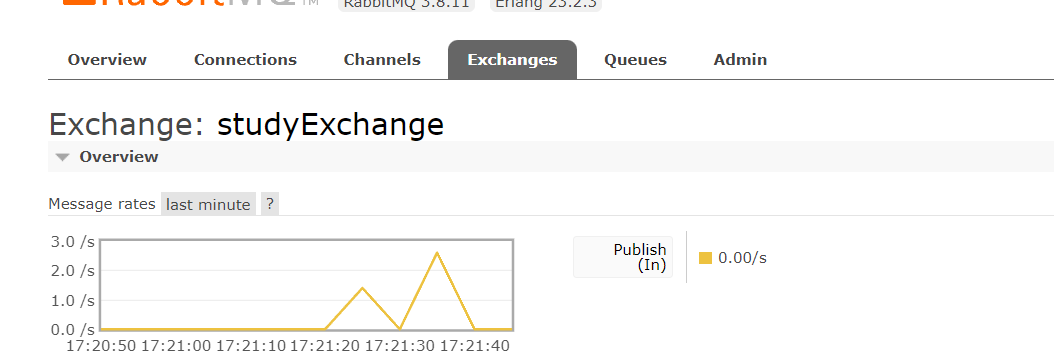
然后访问http://localhost:8801/sendMessage,进行消息发送,可以看到Exchange的情况
接下来需要建立消费者进行消息的消费
# 消息驱动之消费者
新建cloud-stream-rabbitmq-consumer8802模块
# pom
依赖和上面的生产者一致即可
# yaml
server:
  port: 8802

spring:
  application:
    name: cloud-stream-consumer
  rabbitmq:
    host: 106.55.240.216
    port: 5672
    username: admin
    password: 123456
  cloud:
    stream:
      binders: # 在此处配置要绑定的rabbitma的服务信息
        defaultRabbit: # 表示定义binder的名称 用于binding整合
          type: rabbit # 消息组件类型
          environment: # 设置rabbitmq的相关环境配置
            spring:
              rabbitmq:
                host: 106.55.240.216
                port: 5672
                username: admin
                password: 123456

      bindings: # 服务的整合处理
        input: # 这个名字是一个通道的名称
          destination: studyExchange # 表示要使用的Exchange的名称
          content-type: application/json # 设置消息类型,本次为json,文本则设置为"text/plain"
          binder: defaultRabbit # 设置要绑定的Binder消息服务的名称 和上面的一致,否则报错

eureka:
  client:
    service-url:
      defaultZone: http://localhost:7001/eureka/
  instance:
    lease-renewal-interval-in-seconds: 2 #设置心跳时间间隔
    lease-expiration-duration-in-seconds: 5
    instance-id: receive-8802.com #在消息列表显示主机名称
    prefer-ip-address: true #显示ip地址
2
3
4
5
6
7
8
9
10
11
12
13
14
15
16
17
18
19
20
21
22
23
24
25
26
27
28
29
30
31
32
33
34
35
36
37
38
39
这里的区别是:端口、服务名称、
bindings下面由生产者中的output改为input、eureka的instance-id不同
# 业务类
package com.zdk.springcloud.controller;

import org.springframework.beans.factory.annotation.Value;
import org.springframework.cloud.stream.annotation.EnableBinding;
import org.springframework.cloud.stream.annotation.StreamListener;
import org.springframework.cloud.stream.messaging.Sink;
import org.springframework.messaging.Message;
import org.springframework.stereotype.Component;

/**
 * @Description
 * @Author zdk
 * @Date 2022/11/14 17:37
 */
@Component
@EnableBinding(Sink.class) //这里标志这个类是消息的入口 即进入消费者
public class ReceiveMessageListenerController {

    @Value("${server.port}")
    private String serverPort;

    @StreamListener(Sink.INPUT)
    public void input(Message<String> message){
        System.out.println("消费者1号,----->接收到的消息:"+message.getPayload()+"\t  port:"+serverPort);
    }
}
2
3
4
5
6
7
8
9
10
11
12
13
14
15
16
17
18
19
20
21
22
23
24
25
26
# 测试
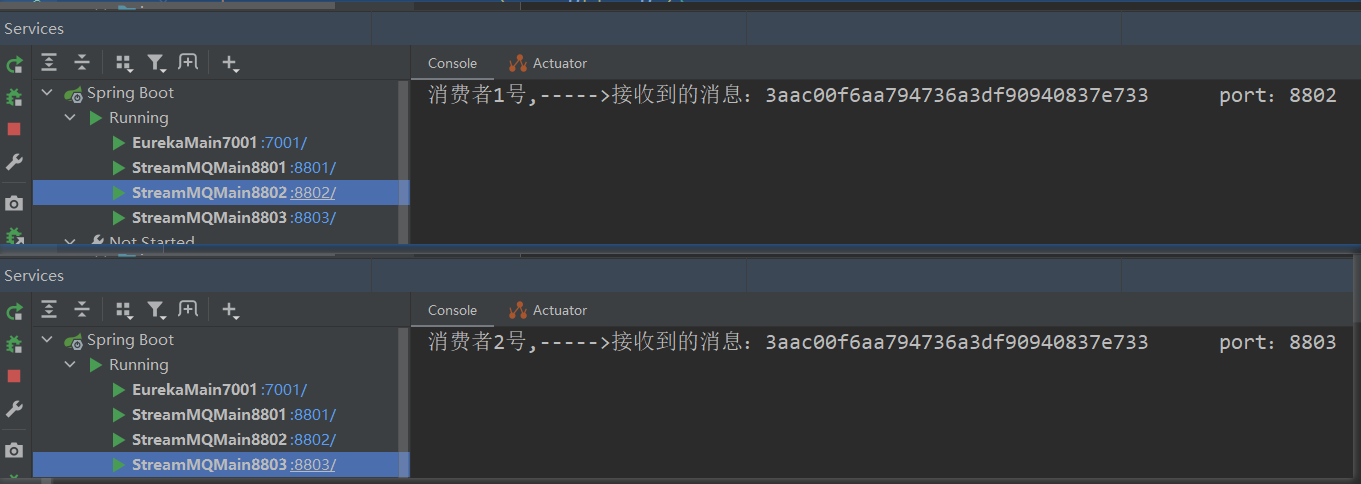
- 生产者方发送几条消息
- 消费者8802已接受到

# 分组消费与持久化
首先,以cloud-stream-rabbitmq-consumer8802模块未模板,建立8803模块并启动项目,
可以发现eureka上已出现实例
# 运行后的问题
- 消息的重复消费
- 消息持久化
# 消费
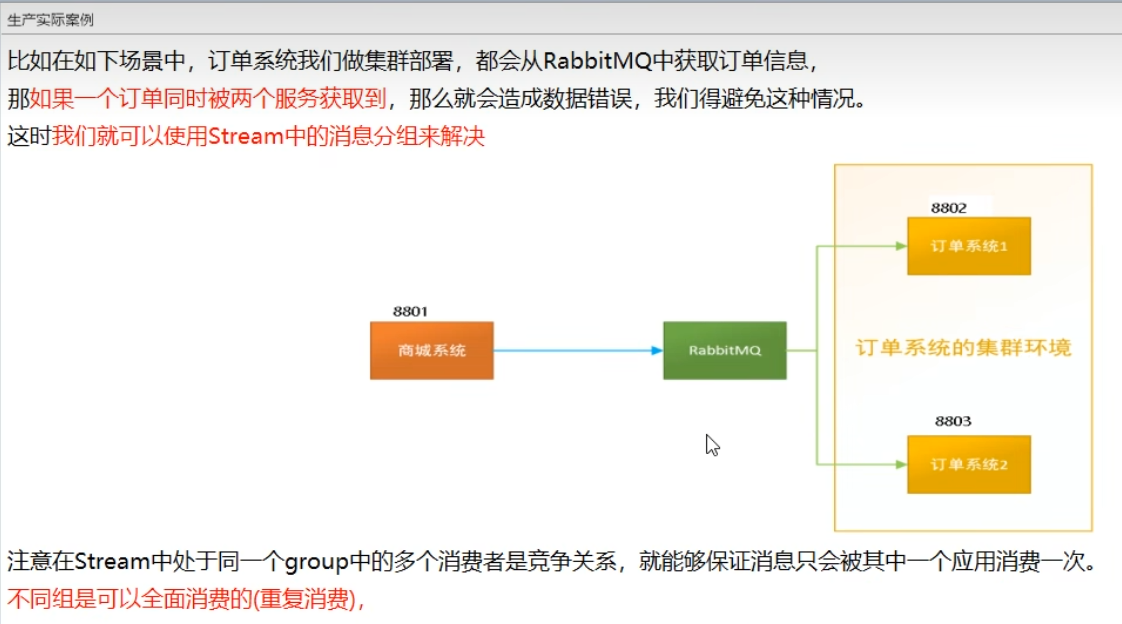
我们发送一条消息,会发现8802和8803同时都收到该消息,都成功消费了这条消息,存在重复消费问题
# 分组
注意在Stream中处于同一个group中的多个消费者是竞争关系,就能够保证消息只会被其中一个应用消费 一次。 不同组是可以全面消费的(重复消费),同一组内会发生竞争关系,只有其中一个可以消费。
- 8802/8803都变成不同组,即group两个不同
- 8802/8803实现了轮询分组,每次只有一个消费者,8801模块的发的消息只能被8802或8803其中一个接收到,这样避免了重复消费
- 8802/8803都变成相同组,即group两个相同
# 配置不同组进行测试
在8802 8803的yaml中分别配置group属性
bindings: # 服务的整合处理
  input: # 这个名字是一个通道的名称
    destination: studyExchange # 表示要使用的Exchange的名称
    content-type: application/json # 设置消息类型,本次为json,文本则设置为"text/plain"
    binder: defaultRabbit # 设置要绑定的Binder消息服务的名称 和上面的一致,否则报错
    #group: tGroupA #8802
    group: tGroupB #8803
2
3
4
5
6
7
测试可以发现,8802和8803都消费了消息
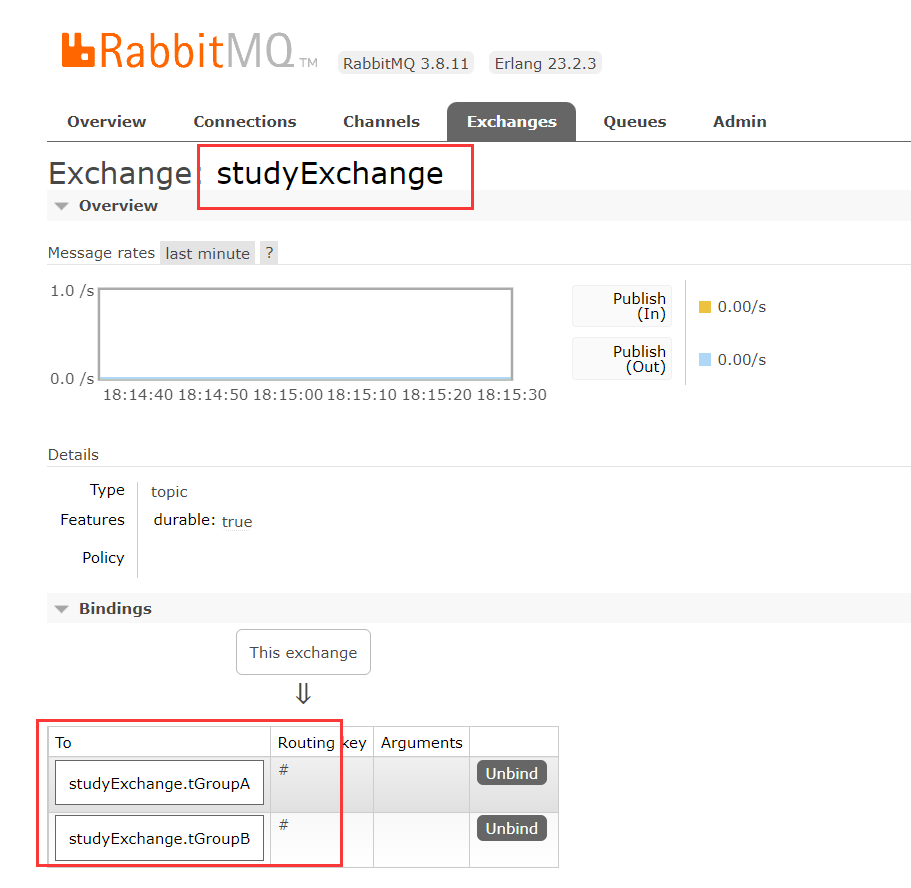
实质因为交换机绑定了两个名分别为tGroupA、tGroupB的队列
# 配置相同组测试
现在将两个服务的group都修改为
tGroup并重启,发送一条消息
可以发现,现在只有8802消费者进行了消费
如果发送多条消息,会发现两个消费者轮询一人一条消息,因为这其实就是RabbitMQ队列默认的轮询模式,每个消费者一个一条消息
# 持久化
这里的持久化问题,实际上是很简单的,视频中讲得其实并不好理解。
简单来说呢,就是,当我们配置group属性,消息会被持久化到
交换机名.group这个队列当中,这个队列是持久化的,不是临时的。
而没有配置group属性,程序启动时,创建的是一个临时的队列,名称是RabbitMQ自动生成的,所以在服务停止或宕机后,因为是内存中的临时队列,没有持久化,所以里面的消息会丢失。
这里的持久化,仍旧是RabbitMQ本身的性质,而不是SpringCloud Stream的,只是说SpringCloud Stream利用group配置,代替了RabbitMQ里创建一个自定义名称的、持久化的队列的操作而已。