 SpringBoot封装starter并上传到maven仓库
Table of Contents generated with DocToc (opens new window)
# 封装starter
首先是创建一个普通的SpringBoot项目,注意命名,然后导入依赖
这里说下artifactId的命名问题,Spring 官方 Starter通常命名为
spring-boot-starter-{name}如spring-boot-starter-web。Spring官方建议非官方Starter命名应遵循
{name}-spring-boot-starter的格式
# maven依赖
		<dependency>
            <groupId>org.springframework.boot</groupId>
            <artifactId>spring-boot-starter</artifactId>
            <version>2.3.7.RELEASE</version>
        </dependency>

        <dependency>
            <groupId>org.springframework.boot</groupId>
            <artifactId>spring-boot-starter-test</artifactId>
            <scope>test</scope>
            <exclusions>
                <exclusion>
                    <groupId>org.junit.vintage</groupId>
                    <artifactId>junit-vintage-engine</artifactId>
                </exclusion>
            </exclusions>
            <version>2.3.7.RELEASE</version>
        </dependency>
        <!-- @ConfigurationProperties annotation processing (metadata for IDEs)
                 生成spring-configuration-metadata.json类,需要引入此类-->
        <dependency>
            <groupId>org.springframework.boot</groupId>
            <artifactId>spring-boot-configuration-processor</artifactId>
            <optional>true</optional>
            <version>2.3.7.RELEASE</version>
        </dependency>
        <dependency>
            <groupId>org.springframework.boot</groupId>
            <artifactId>spring-boot-autoconfigure</artifactId>
            <version>2.3.7.RELEASE</version>
        </dependency>
2
3
4
5
6
7
8
9
10
11
12
13
14
15
16
17
18
19
20
21
22
23
24
25
26
27
28
29
30
31
注意其中
spring-boot-configuration-processor的作用是编译时生成spring-configuration-metadata.json, 此文件主要给IDE使用,用于提示使用。如在intellij idea中,当配置此jar相关配置属性在application.yml, 你可以用ctlr+鼠标左键,IDE会跳转到你配置此属性的类中。
# 编写属性配置类(upyun为例)
@ConfigurationProperties(prefix = "up-yun")
public class UpYunProperties {
    private Boolean enable;
    private String bucketName;
    private String userName;
    private String password;
    private String imageParam;

    public Boolean getEnable() {
        return enable;
    }

    public void setEnable(Boolean enable) {
        this.enable = enable;
    }

    public String getBucketName() {
        return bucketName;
    }

    public void setBucketName(String bucketName) {
        this.bucketName = bucketName;
    }

    public String getUserName() {
        return userName;
    }

    public void setUserName(String userName) {
        this.userName = userName;
    }

    public String getPassword() {
        return password;
    }

    public void setPassword(String password) {
        this.password = password;
    }

    public String getImageParam() {
        return imageParam;
    }

    public void setImageParam(String imageParam) {
        this.imageParam = imageParam;
    }
}
2
3
4
5
6
7
8
9
10
11
12
13
14
15
16
17
18
19
20
21
22
23
24
25
26
27
28
29
30
31
32
33
34
35
36
37
38
39
40
41
42
43
44
45
46
47
48
@ConfigurationProperties(prefix = "up-yun")中的值,是你的properties文件或yaml文件配置的根属性
# 编写自动配置类
@Configuration
@ConditionalOnClass(UpYunOssService.class)
@EnableConfigurationProperties(UpYunProperties.class)
public class UpYunAutoConfigure {
    @Autowired
    private UpYunProperties upYunProperties;

    @Bean
    @ConditionalOnMissingBean
    @ConditionalOnProperty(prefix = "up-yun",value = "enable",havingValue = "true")
    public UpYunOssService upYunOssService(){
        return new UpYunOssService();
    }
}
2
3
4
5
6
7
8
9
10
11
12
13
14
ConditionalOnClass(UpYunOssService.class):当classpath下发现该类的情况下进行自动配置
@EnableConfigurationProperties(UpYunProperties.class):开启属性自动配置,指定这个配置类的配置属性类
@ConditionalOnMissingBean:当Spring容器中不存在该Bean时进行配置
@ConditionalOnProperty(prefix = "up-yun",value = "enable",havingValue = "true"),当配置文件中up-yun.enable=true时
# 添加spring.factories
在resource目录下创建META-INF文件夹,在这个文件夹中创建spring.factories文件,内容如下:
org.springframework.boot.autoconfigure.EnableAutoConfiguration=\
com.zdk.starter.config.UpYunAutoConfigure
2
这里是要指定你的自动配置类的全类名位置。如果有多个自动配置类,用逗号分隔换行即可。具体可参考SpringBoot的factories
# 总结
总结下Starter的工作原理:
- Spring Boot在启动时扫描项目所依赖的JAR包,寻找包含
spring.factories文件的JAR包 - 根据
spring.factories配置加载AutoConfigure类 - 根据
@Conditional注解的条件,进行自动配置并将Bean注入Spring Context
到这里基本的代码已经可以了,下面是要将这个starter上传到maven仓库,让所有人都能使用
# 上传到maven仓库
# Sonatype
我们需要向Sonatype申请上传maven的资格
# 1.注册sonatype
地址:https://issues.sonatype.org/secure/Signup!default.jspa
# 2.注册以后登录
登录地址:https://issues.sonatype.org/login.jsp
# 3.新建issue
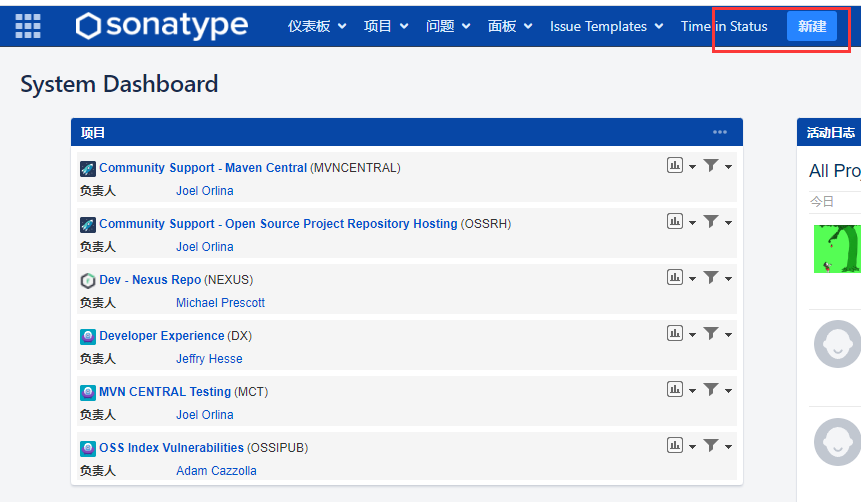
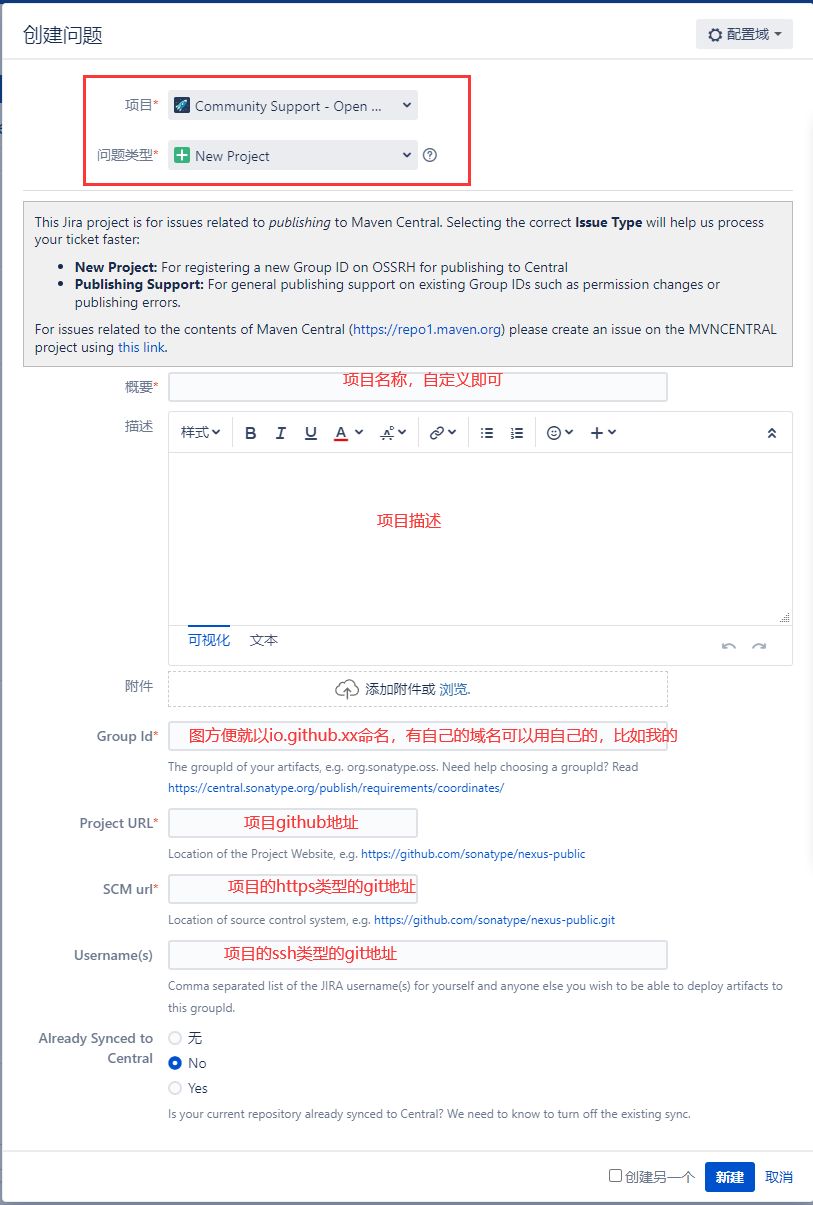
# 4.认证
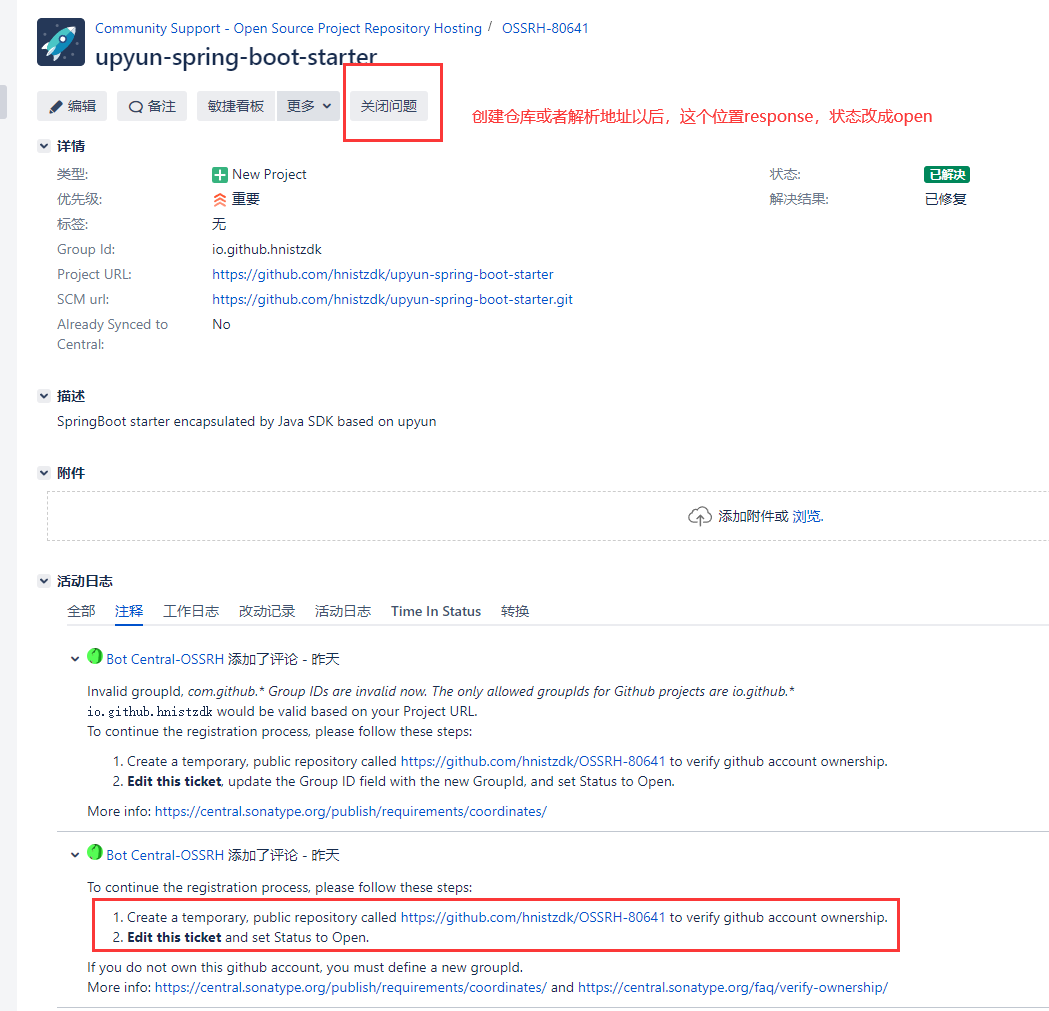
新建以后会受到comment,如果是github的话,会让你新建一个指定的public的仓库,来证明前面填的github仓库的所有权确实是你;如果是自己的域名的话,会让你将某个地址以TXT形式解析一下,都不难操作。
# GPG
# 1.安装gpg
Sonatype要求所有部署的文件都需要使用GPG / PGP.asc签名,并且每个文件都必须包含一个包含签名的文件,所以我们需要生成密钥对
这里我们用到Gpg4win来生成密钥
下载后无脑下一步进行安装即可,注意安装位置,后面需要用到
# 2.生成签名文件
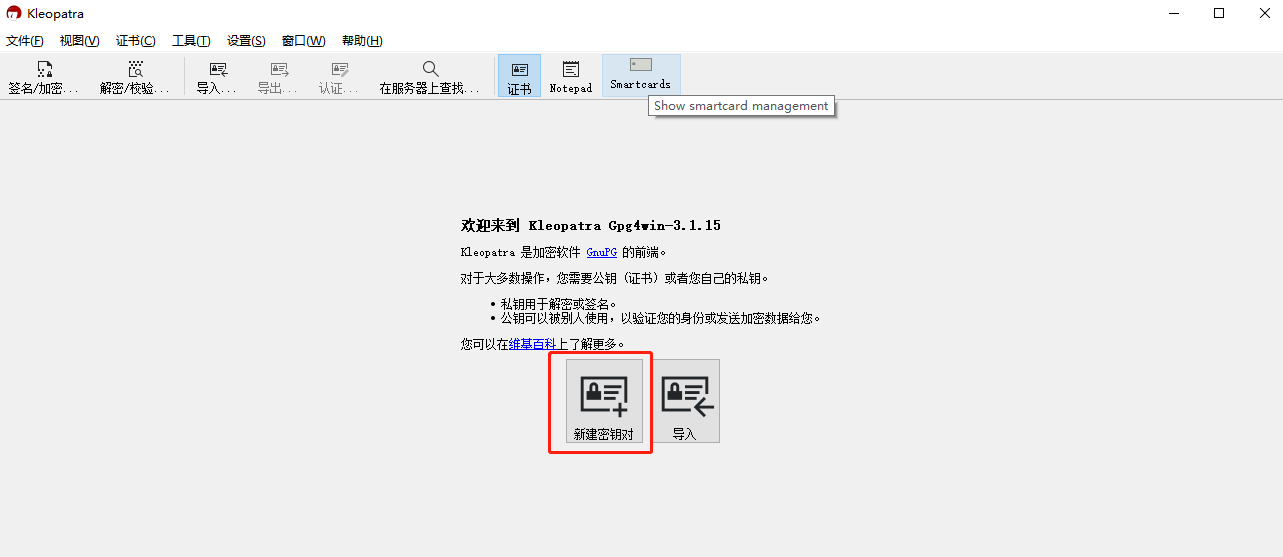
启动安装好的kleopatra.exe
然后输入信息进行创建,创建好以后会有一长串数字和字母组成的指纹
回主界面就可以看到了

# 3.修改密码
双击生成的,然后点击
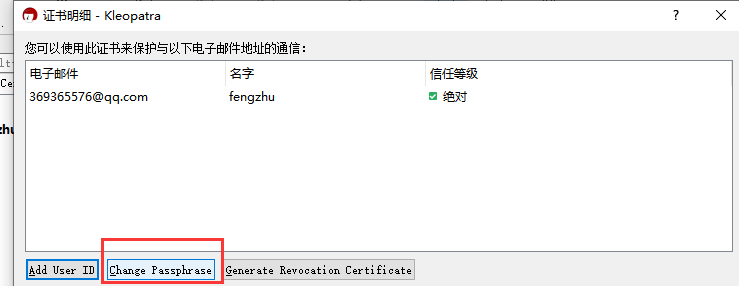
根据提示操作即可,这是要设定上传jar包时gpg操作的密码,很重要!
# 4.把生成的gpg公钥上传至公共秘钥服务器
两个命令:
- 发送秘钥
gpg --keyserver keyserver.ubuntu.com --send-keys 刚才生成的那一串字符
- 查看是否成功
gpg --keyserver keyserver.ubuntu.com --recv-keys 刚才生成的那一串字符
# 配置文件修改
# maven的setting.xml
- 先增加一个server,注意这里的id很重要
  <servers>
   <server>
      <!-- 此id可以随便写,但是一定要保证和pom中的snapshotRepository一致 -->
      <id>xxx</id>
      <!-- 此处是注册sonatype的账号 -->
      <username>xxx</username>
      <!-- 此处是注册sonatype的密码 -->
      <password>xxx</password>
    </server>
  </servers>
2
3
4
5
6
7
8
9
10
- 再增加一个profile,这里的id一样和上面要一样,
  <profiles>
	<profile>
		<id>xxx</id>
		<activation>
			<activeByDefault>true</activeByDefault>
		</activation>
		<properties>
			<gpg.executable>gpg</gpg.executable>
            <!-- 这里填刚才gpg的密码-->
			<gpg.passphrase>xxx</gpg.passphrase>
		</properties>
	</profile>
  </profiles>
2
3
4
5
6
7
8
9
10
11
12
13
# pom.xml
# 1.项目信息部分
	<modelVersion>4.0.0</modelVersion>
	<!-- 这里的groupId就是issue中的groupId-->
    <groupId>io.github.hnistzdk </groupId>
    <artifactId>upyun-spring-boot-starter</artifactId>
	<!-- 只有快照版本才加-SNAPSHOT  发布版不用加或者加RELEASE-->
    <version>1.0.1</version>
	<!-- 项目名称-->
    <name>upyun-spring-boot-starter</name>
	<!-- 项目地址  发布release版本必须有  不然会爆错-->
	<url>https://github.com/hnistzdk/upyun-spring-boot-starter</url>
    <description>upyun-spring-boot-starter</description>
2
3
4
5
6
7
8
9
10
11
# 2.版本properties
<properties>
        <java.version>1.8</java.version>
        <project.build.sourceEncoding>UTF-8</project.build.sourceEncoding>
        <project.reporting.outputEncoding>UTF-8</project.reporting.outputEncoding>
        <spring-boot.version>2.3.7.RELEASE</spring-boot.version>
    	<!-- 一定要指定编译版本,不然maven构建时会频繁改项目的到1.5-->
        <maven.compiler.source>1.8</maven.compiler.source>
        <maven.compiler.target>1.8</maven.compiler.target>
</properties>
2
3
4
5
6
7
8
9
# 3.添加版权许可
	<!-- 自己的是什么就填什么 Apache、MIT等等-->
	<licenses>
        <license>
            <name>The Apache Software License, Version 2.0</name>
            <url>http://www.apache.org/licenses/LICENSE-2.0.txt</url>
            <distribution>repo</distribution>
        </license>
    </licenses>
2
3
4
5
6
7
8
# 4.代码库信息
	<!-- 按形式来即可-->
	<scm>
        <url>https://github.com/hnistzdk/upyun-spring-boot-starter</url>
        <connection>scm:git:git://github.com/hnistzdk/upyun-spring-boot-starter.git</connection>
        <developerConnection>scm:git:ssh://github.com:hnistzdk/upyun-spring-boot-starter.git</developerConnection>
    </scm>
2
3
4
5
6
# 5.开发者信息
	<developers>
        <developer>
            <name>zdk</name>
            <email>369365576@qq.com</email>
            <roles>
                <role>owner</role>
            </roles>
            <timezone>+8</timezone>
        </developer>
    </developers>
2
3
4
5
6
7
8
9
10
# 6.(重点)定义nexus地址
<!-- 定义snapshots库和releases库的nexus地址 -->
    <distributionManagement>
        <snapshotRepository>
            <!-- 这里的id一定要和maven配置里的server的id一致 -->
            <id>io.github.hnistzdk</id>
            <name>Sonatype Nexus Snapshots</name>
            <!-- url的s01.oss.sonatype.org部分 以你的issue收到的comment里面的为准 -->
            <url>https://s01.oss.sonatype.org/content/repositories/snapshots/</url>
        </snapshotRepository>
        <repository>
            <!-- 这里的id一定要和maven配置里的server的id一致 -->
            <id>io.github.hnistzdk</id>
            <name>Nexus Release Repository</name>
            <!-- url的s01.oss.sonatype.org部分 以你的issue收到的comment里面的为准 -->
            <url>https://s01.oss.sonatype.org/service/local/staging/deploy/maven2/</url>
        </repository>
    </distributionManagement>
2
3
4
5
6
7
8
9
10
11
12
13
14
15
16
17
# 7.(重点)build中配置
<build>
        <plugins>
            <plugin>
                <groupId>org.springframework.boot</groupId>
                <artifactId>spring-boot-maven-plugin</artifactId>
                <version>2.6.7</version>
                <configuration>
                    <skip>true</skip>
                    <excludes>
                        <exclude>
                            <groupId>org.projectlombok</groupId>
                            <artifactId>lombok</artifactId>
                        </exclude>
                    </excludes>
                </configuration>
            </plugin>
            <plugin>
                <groupId>org.sonatype.plugins</groupId>
                <artifactId>nexus-staging-maven-plugin</artifactId>
                <version>1.6.7</version>
                <extensions>true</extensions>
                <configuration>
                    <!-- 这里的id一定要和maven配置里的server的id一致 -->
                    <serverId>io.github.hnistzdk</serverId>
                    <!--  同样以收到的comment中的为准-->
                    <nexusUrl>https://s01.oss.sonatype.org/</nexusUrl>
                    <!-- 这里配置为true以后 不用再去nexus中手动发布 -->
                    <autoReleaseAfterClose>true</autoReleaseAfterClose>
                </configuration>
            </plugin>
            <plugin>
                <groupId>org.apache.maven.plugins</groupId>
                <artifactId>maven-source-plugin</artifactId>
                <version>2.2.1</version>
                <executions>
                    <execution>
                        <id>attach-sources</id>
                        <goals>
                            <goal>jar-no-fork</goal>
                        </goals>
                    </execution>
                </executions>
            </plugin>
            <plugin>
                <groupId>org.apache.maven.plugins</groupId>
                <artifactId>maven-javadoc-plugin</artifactId>
                <version>2.9.1</version>
                <configuration>
                    <charset>UTF-8</charset>
                    <!-- jdk1.8要加上,1.7要去掉,否则会报错 -->
                    <additionalJOptions>
                        <additionalJOption>-Xdoclint:none</additionalJOption>
                    </additionalJOptions>
                </configuration>
                <executions>
                    <execution>
                        <id>attach-javadocs</id>
                        <goals>
                            <goal>jar</goal>
                        </goals>
                    </execution>
                </executions>
            </plugin>
            <plugin>
                <groupId>org.apache.maven.plugins</groupId>
                <artifactId>maven-gpg-plugin</artifactId>
                <version>1.5</version>
                <executions>
                    <execution>
                        <id>sign-artifacts</id>
                        <phase>verify</phase>
                        <goals>
                            <goal>sign</goal>
                        </goals>
                    </execution>
                </executions>
            </plugin>
        </plugins>
    </build>
2
3
4
5
6
7
8
9
10
11
12
13
14
15
16
17
18
19
20
21
22
23
24
25
26
27
28
29
30
31
32
33
34
35
36
37
38
39
40
41
42
43
44
45
46
47
48
49
50
51
52
53
54
55
56
57
58
59
60
61
62
63
64
65
66
67
68
69
70
71
72
73
74
75
76
77
78
79
# 注意点
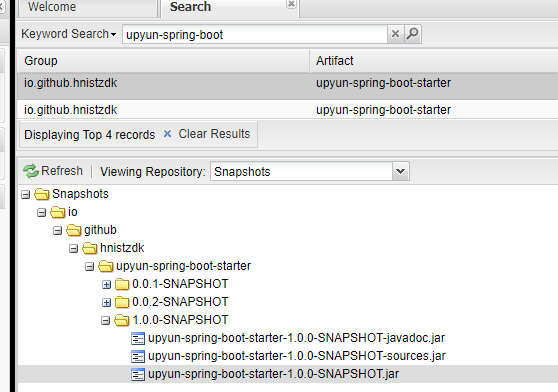
如果版本写x.x.x-SNAPSHOT,即快照版本,是无法正式发布的,Staging Repositories会显示No staging repositories available,但是在https://s01.oss.sonatype.org/#welcome中可以查找到
想要正式发布的话需要以RELEASE结尾,只要版本号x.x.x
# 完整pom
<?xml version="1.0" encoding="UTF-8"?>
<project xmlns="http://maven.apache.org/POM/4.0.0" xmlns:xsi="http://www.w3.org/2001/XMLSchema-instance"
         xsi:schemaLocation="http://maven.apache.org/POM/4.0.0 https://maven.apache.org/xsd/maven-4.0.0.xsd">
    <modelVersion>4.0.0</modelVersion>
    <groupId>io.github.hnistzdk </groupId>
    <artifactId>upyun-spring-boot-starter</artifactId>
    <version>1.0.0</version>
    <name>upyun-spring-boot-starter</name>
    <url>https://github.com/hnistzdk/upyun-spring-boot-starter</url>
    <description>upyun-spring-boot-starter</description>

    <properties>
        <java.version>1.8</java.version>
        <project.build.sourceEncoding>UTF-8</project.build.sourceEncoding>
        <project.reporting.outputEncoding>UTF-8</project.reporting.outputEncoding>
        <spring-boot.version>2.3.7.RELEASE</spring-boot.version>
        <maven.compiler.source>1.8</maven.compiler.source>
        <maven.compiler.target>1.8</maven.compiler.target>
    </properties>

    <!-- 版权许可 -->
    <licenses>
        <license>
            <name>The Apache Software License, Version 2.0</name>
            <url>http://www.apache.org/licenses/LICENSE-2.0.txt</url>
            <distribution>repo</distribution>
        </license>
    </licenses>
    <!-- 代码库 -->
    <scm>
        <url>https://github.com/hnistzdk/upyun-spring-boot-starter</url>
        <connection>scm:git:git://github.com/hnistzdk/upyun-spring-boot-starter.git</connection>
        <developerConnection>scm:git:ssh://github.com:hnistzdk/upyun-spring-boot-starter.git</developerConnection>
    </scm>
    <!-- 开发者信息 -->
    <developers>
        <developer>
            <name>zdk</name>
            <email>369365576@qq.com</email>
            <roles>
                <role>owner</role>
            </roles>
            <timezone>+8</timezone>
        </developer>
    </developers>

    <dependencies>
        <dependency>
            <groupId>org.springframework.boot</groupId>
            <artifactId>spring-boot-starter</artifactId>
            <version>2.6.7</version>
        </dependency>

        <dependency>
            <groupId>org.springframework.boot</groupId>
            <artifactId>spring-boot-starter-test</artifactId>
            <scope>test</scope>
            <exclusions>
                <exclusion>
                    <groupId>org.junit.vintage</groupId>
                    <artifactId>junit-vintage-engine</artifactId>
                </exclusion>
            </exclusions>
            <version>2.6.7</version>
        </dependency>
        <!-- @ConfigurationProperties annotation processing (metadata for IDEs)
                 生成spring-configuration-metadata.json类,需要引入此类-->
        <dependency>
            <groupId>org.springframework.boot</groupId>
            <artifactId>spring-boot-configuration-processor</artifactId>
            <optional>true</optional>
            <version>2.6.7</version>
        </dependency>
        <dependency>
            <groupId>org.springframework.boot</groupId>
            <artifactId>spring-boot-autoconfigure</artifactId>
            <version>2.6.7</version>
        </dependency>

        <!--        又拍云SDK-->
        <dependency>
            <groupId>com.upyun</groupId>
            <artifactId>java-sdk</artifactId>
            <version>4.2.3</version>
        </dependency>
    </dependencies>

    <!-- 定义snapshots库和releases库的nexus地址 -->
    <distributionManagement>
        <snapshotRepository>
            <id>io.github.hnistzdk</id>
            <name>Sonatype Nexus Snapshots</name>
            <url>https://s01.oss.sonatype.org/content/repositories/snapshots/</url>
        </snapshotRepository>
        <repository>
            <id>io.github.hnistzdk</id>
            <name>Nexus Release Repository</name>
            <url>https://s01.oss.sonatype.org/service/local/staging/deploy/maven2/</url>
        </repository>
    </distributionManagement>

    <build>
        <plugins>
            <plugin>
                <groupId>org.springframework.boot</groupId>
                <artifactId>spring-boot-maven-plugin</artifactId>
                <version>2.6.7</version>
                <configuration>
                    <skip>true</skip>
                    <excludes>
                        <exclude>
                            <groupId>org.projectlombok</groupId>
                            <artifactId>lombok</artifactId>
                        </exclude>
                    </excludes>
                </configuration>
            </plugin>
            <plugin>
                <groupId>org.sonatype.plugins</groupId>
                <artifactId>nexus-staging-maven-plugin</artifactId>
                <version>1.6.7</version>
                <extensions>true</extensions>
                <configuration>
                    <serverId>io.github.hnistzdk</serverId>
                    <nexusUrl>https://s01.oss.sonatype.org/</nexusUrl>
                    <autoReleaseAfterClose>true</autoReleaseAfterClose>
                </configuration>
            </plugin>
            <plugin>
                <groupId>org.apache.maven.plugins</groupId>
                <artifactId>maven-source-plugin</artifactId>
                <version>2.2.1</version>
                <executions>
                    <execution>
                        <id>attach-sources</id>
                        <goals>
                            <goal>jar-no-fork</goal>
                        </goals>
                    </execution>
                </executions>
            </plugin>
            <plugin>
                <groupId>org.apache.maven.plugins</groupId>
                <artifactId>maven-javadoc-plugin</artifactId>
                <version>2.9.1</version>
                <configuration>
                    <charset>UTF-8</charset>
                    <!-- jdk1.8要加上,1.7要去掉,否则会报错 -->
                    <additionalJOptions>
                        <additionalJOption>-Xdoclint:none</additionalJOption>
                    </additionalJOptions>
                </configuration>
                <executions>
                    <execution>
                        <id>attach-javadocs</id>
                        <goals>
                            <goal>jar</goal>
                        </goals>
                    </execution>
                </executions>
            </plugin>
            <plugin>
                <groupId>org.apache.maven.plugins</groupId>
                <artifactId>maven-gpg-plugin</artifactId>
                <version>1.5</version>
                <executions>
                    <execution>
                        <id>sign-artifacts</id>
                        <phase>verify</phase>
                        <goals>
                            <goal>sign</goal>
                        </goals>
                    </execution>
                </executions>
            </plugin>
        </plugins>
    </build>
</project>
2
3
4
5
6
7
8
9
10
11
12
13
14
15
16
17
18
19
20
21
22
23
24
25
26
27
28
29
30
31
32
33
34
35
36
37
38
39
40
41
42
43
44
45
46
47
48
49
50
51
52
53
54
55
56
57
58
59
60
61
62
63
64
65
66
67
68
69
70
71
72
73
74
75
76
77
78
79
80
81
82
83
84
85
86
87
88
89
90
91
92
93
94
95
96
97
98
99
100
101
102
103
104
105
106
107
108
109
110
111
112
113
114
115
116
117
118
119
120
121
122
123
124
125
126
127
128
129
130
131
132
133
134
135
136
137
138
139
140
141
142
143
144
145
146
147
148
149
150
151
152
153
154
155
156
157
158
159
160
161
162
163
164
165
166
167
168
169
170
171
172
173
174
175
176
177
178
# 上传
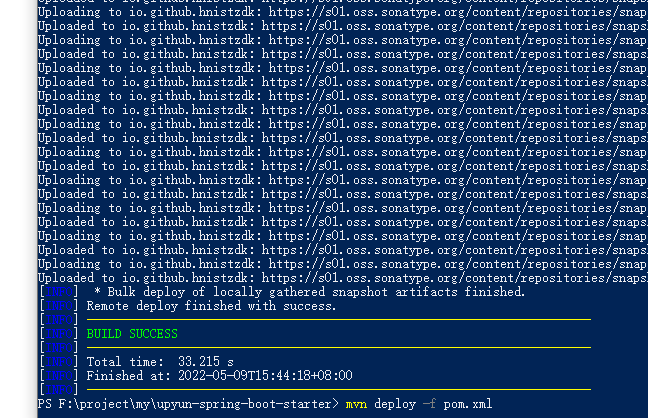
最后进行打包上传,先clean一下,然后使用windows的powershell进行运行命令(cmd会没有权限)
mvn deploy -f pom.xml1
然后可以去oss上进行查看是否上传成功https://s01.oss.sonatype.org/#welcome
# 发布release
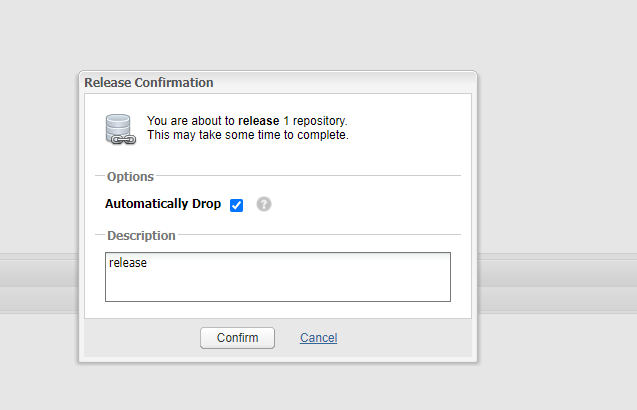
版本号不加-SNAPSHOT,可以只需要版本号或者加上-RELEASE或.RELEASE,然后到仓库中
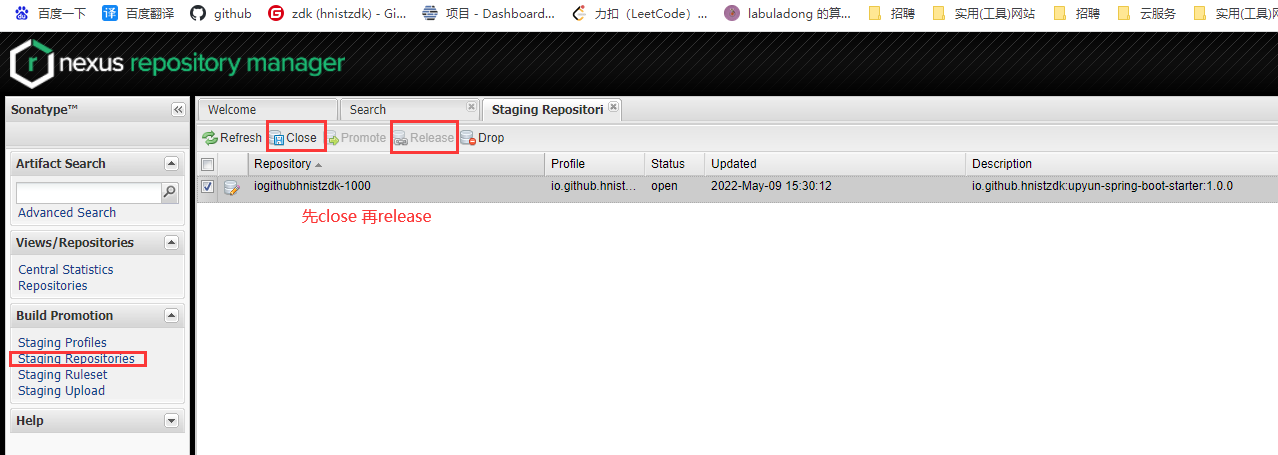
提交成功进行等待,然后去https://search.maven.org或者https://mvnrepository.com等中央仓库进行查询你的项目 (opens new window)
