 多线程基础
多线程基础
Table of Contents generated with DocToc (opens new window)
# 1、多线程基础
# 基本概念
程序(program):是为完成特定任务、用某种语言编写的一组指令的集合。即指一段静态的代码,静态对象
进程(process)是程序的一次执行过程,或是正在运行的一个程序。是一个动态的过程:有它自身的产生、存在和消亡的过程。——生命周期
- 如:运行中的QQ,运行中的MP3播放器
- 程序是静态的,进程是动态的
- 进程作为资源分配的单位,系统在运行时会为每个进程分配不同的内存区域
线程(thread),进程可进一步细化为线程,是一个程序内部的一条执行路径。
- 若一个进程同一时间并行执行多个线程,就是支持多线程的
- 线程作为调度和执行的单位,每个线程拥有独立的运行栈和程序计数器(pc),线程切换的开销小
- 一个进程中的多个线程共享相同的内存单元/内存地址空间→它们从同一堆中分配对象,可以访问相同的变量和对象。这就使得线程间通信更简便、高效。但多个线程操作共享的系统资源可能就会带来安全的隐患。
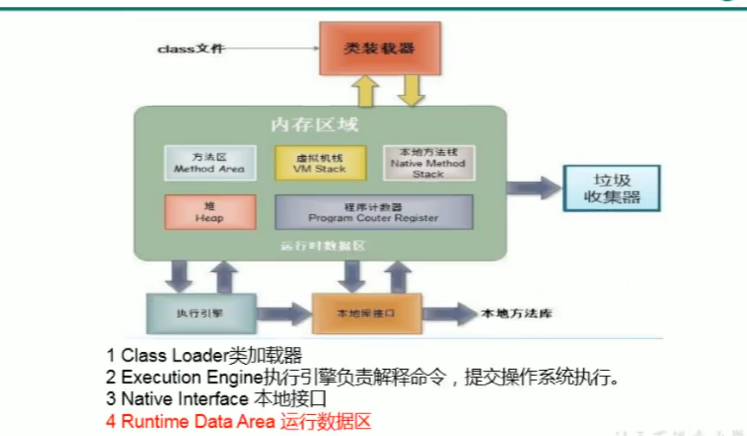
JVM内存结构

每个线程都具有一个虚拟机栈和一个程序计数器,而方法区和堆,则是每个进程有一个
,所以多个线程共享一个进程中的方法区和堆。
- 单核CPU和多核CPU的理解
- 单核CPU,其实是一种假的多线程,因为在一个时间单元内,也只能执行一个线程的任务。例如:虽然有多车道,但是收费站只有一个工作人员在收费,只有收了费才能通过,那么CPU就好比收费人员。如果有某个人不想交钱,那么收费人员可以把他“挂起”(晾着他,等他想通了,准备好了钱,再去收费)。但是因为CPU时间单元特别短,因此感觉不出来。
- 如果是多核的话,才能更好的发挥多线程的效率。(现在的服务器都是多核的)
- 一个Java应用程序java.exe,其实至少有三个线程: main()主线程,gc()垃圾回收线程,异常处理线程。当然如果发生异常,会影响主线程。
- 并行和并发
- 并行:多个CPU同时执行多个任务。比如:多个人同时做不同的事
- 并发:一个CPU(采用时间片)同时执行多个任务。比如:秒杀、多个人做同一件事
# 线程的创建和使用
# 方式一:继承Thread类
1.创建—个继承于Thread类的子类
2.重写Thread类的run()
3.创建Thread类的子类的对象
4.通过此对象调用start()
问题1:如果直接调用t1的run()方法,则不会另起一个线程执行,而是就在主线程执行此run()方法
问题2:想第二次调用start()启动一个新线程,是不可行的,需要新建一个对象
示例:
public class ThreadTest {
    public static void main(String[] args) {
        MyThread t1 = new MyThread();
        t1.start();
        MyThread t2 = new MyThread();
        t2.start();
        for (int i = 0; i < 100; i++) {
            if (i % 2 == 0){
                System.out.println(Thread.currentThread().getName() + ":"+i);
            }
        }
    }
}
class MyThread extends Thread {
    @Override
    public void run() {
        for (int i = 0; i < 100; i++) {
            if (i % 2 == 0){
                System.out.println(Thread.currentThread().getName() + ":"+i);
            }
        }
    }
}
2
3
4
5
6
7
8
9
10
11
12
13
14
15
16
17
18
19
20
21
22
23
24
# 1.Thread类中的常用方法
void start():启动线程,并执行对象的run()方法
run():线程在被调度时执行的操作
String getName():返回线程的名称
void setName(String name):设置该线程名称
static Thread currentThread():返回当前线程。在Thread子类中就是this,通常用于主线程和Runnable实现类
yield():释放当前CPU的执行权,即先不执行当前线程了
join():在线程a中调用线程b的join()方法,此时线程a就进入了阻塞状态,直到线程b完全执行完以后,线程a才结束阻塞状态继续执行
	@Test
    public void joinTest(){
        MyThread t1 = new MyThread();
        t1.start();
        Thread.currentThread().setName("主线程");
        for (int i = 0; i < 100; i++) {
            if (i % 2 == 0){
                System.out.println(Thread.currentThread().getName() + ":"+i);
            }
            if (i == 20){
                try {
                    t1.join();
                } catch (InterruptedException e) {
                    e.printStackTrace();
                }
            }
        }

    }

//当主线程输出到20时,此后t1就一直执行,知道t1执行结束
1
2
3
4
5
6
7
8
9
10
11
12
13
14
15
16
17
18
19
20
21static void sleep(long millis):指定时间:毫秒
- 令当前活动线程在指定时间段内放弃对CPU的控制,使其他线程有机会被执行,时间到后该线程重新排队
- 抛出InterruptedException异常
stop():强制线程生命期结束(不推荐使用)
boolean isAlive():返回boolean ,判断线程是否还活着
# 2.线程的调度
- 调度策略:
- 时间片

- 抢占式:高优先级的线程会抢占CPU
- 时间片
- java的调度方式
- 同优先级线程组成先进先出队列(先到先服务),使用时间片策略
- 对搞优先级,使用优先调度的抢占式策略
- 线程的优先级等级
- MAX_PRIORITY:10
- MIN_PRIORITY:1
- NORM_PRIORITY:5,默认的优先级
- 涉及的方法:
- getPriority():返回线程优先级的值
- setPriority(int p):改变线程的优先级
- 说明:
- 线程创建时继承父线程的优先级
- 低优先级只是获得调度的概率低,并非一定是在高优先级线程之后才被调用
# 方式二:实现Runnable接口
步骤:
- 创建一个实现了Runnable接口的类
- 实现类去实现Runnable接口中的抽象方法:run()
- 创建实现类的对象
- 将此对象作为参数传递到Thread类的构造器中,创建Thread类的对象
- 通过Thread类的对象调用start()方法
public class RunnableTest {
    public static void main(String[] args) {
        RunnableThread t1 = new RunnableThread();
        //要创建多个线程时,不用new新的实现了Runnable接口的对象了,且该对象的属性被所有因它而产生的的线程共享
        Thread thread = new Thread(t1);
        Thread thread1 = new Thread(t1);
        Thread thread2 = new Thread(t1);
        thread.start();
        thread1.start();
        thread2.start();
    }
}


class RunnableThread implements Runnable{
    @Override
    public void run() {
        for (int i = 0; i < 100; i++) {
            if (i % 2 == 0) {
                System.out.println(Thread.currentThread().getName() + ":"+i);
            }
        }
    }
}
2
3
4
5
6
7
8
9
10
11
12
13
14
15
16
17
18
19
20
21
22
23
24
25
# 两种创建方式的比较
开发中,优先选择实现Runnable接口的方式
原因:
- 实现的方式没有类的单继承性的局限性
- 实现的方式更适合用来处理多个线程有共享数据的情况
联系:Thread类其实实现了Runnable接口
相同点:两种方式都需要重写run(),将线程要执行的逻辑声明在run()中
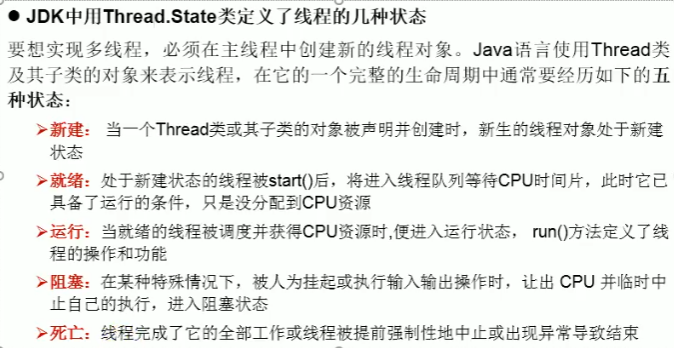
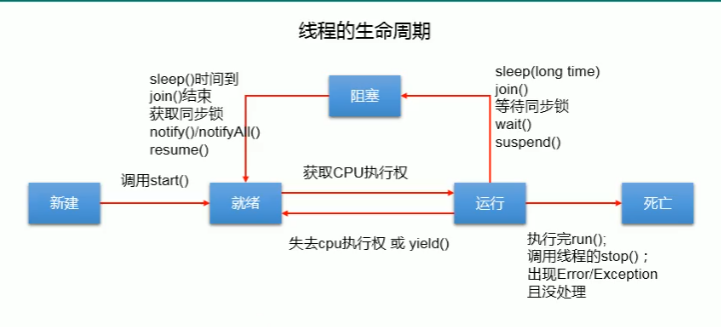
# 线程的生命周期


# 线程的同步(线程安全问题)
多线程可能产生的问题
- 多个线程执行的不确定性引起执行结果的不稳定
- 多个线程对堆空间和方法区数据的共享,会造成操作的不完整性,破坏数据
解决方法:
在java中,我们通过同步机制,来解决线程的安全问题。
局限性:操作同步代码时,只能有一个线程参与,其他线程等待。相当于一个单线程的过程,效率低。
方式一:同步代码块
synchronized(同步监视器){
	//需要被同步的代码

}
说明:
1.操作共享数据的代码,即为需要被同步的代码
2.共享数据:多个线程共同操作的变量。
3.同步监视器,俗称:锁。任何一个类的对象,都可以充当锁。
	锁的要求:多个线程必须要共用同一把锁。
1
2
3
4
5
6
7
8
9代码示例:
public class SyncTest {
    public static void main(String[] args) {
        Window window = new Window();
        Thread t1 = new Thread(window);
        Thread t2 = new Thread(window);
        Thread t3 = new Thread(window);
        t1.start();
        t2.start();
        t3.start();
    }
}

class Window implements Runnable{
    private int ticket = 100;
    //锁保证唯一且所有线程共用
    private Object object = new Object();
    @Override
    public void run() {
        while(true) {
            //使用当前对象充当锁也可(限于实现Runnable的方式)
            //synchronized(this){
            //synchronized(object){
            //使用类.class也可以(Window.class只会加载一次)
            synchronized(Window.class){
                if (ticket > 0){
                    try {
                        Thread.sleep(50);
                    } catch (InterruptedException e) {
                        e.printStackTrace();
                    }
                    System.out.println(Thread.currentThread().getName()+":卖票,票号为:"+ticket);
                    ticket--;
                }else{
                    break;
                }
            }
        }
    }
}
1
2
3
4
5
6
7
8
9
10
11
12
13
14
15
16
17
18
19
20
21
22
23
24
25
26
27
28
29
30
31
32
33
34
35
36
37
38
39补充:1.在实现Runnable接口创建多线程的方式中,我们可以考虑使用this充当同步监视器
2.在继承Thread类创建多线程的方式中,要慎用this充当同步监视器,可以考虑使用当前类.class来充当监视器
方式二:同步方法
如果操作共享数据的代码完整的声明在一个方法中,我们不妨将此方法声明为同步(synchronized)
1.同步方法处理Runnable接口方式的代码示例:
public class SyncTest3 {
    public static void main(String[] args) {
        Window3 window = new Window3();
        Thread t1 = new Thread(window);
        Thread t2 = new Thread(window);
        Thread t3 = new Thread(window);
        t1.start();
        t2.start();
        t3.start();
    }
}

class Window3 implements Runnable {
    private int ticket = 100;

    public synchronized void show() {
        //同步监视器就是this
        if (ticket > 0) {
            try {
                Thread.sleep(50);
            } catch (InterruptedException e) {
                e.printStackTrace();
            }
            System.out.println(Thread.currentThread().getName() + ":卖票,票号为:" + ticket);
            ticket--;
        }
    }

    @Override
    public void run() {
        while (true) {
            show();
        }
    }
}
1
2
3
4
5
6
7
8
9
10
11
12
13
14
15
16
17
18
19
20
21
22
23
24
25
26
27
28
29
30
31
32
33
34
352.同步方法处理继承Thread类的方式:
因为此时有多个Thread类,使用Runnable的处理方式的话,this表示每一个类的对象,锁即不唯一了。为了解决这个问题,可以把同步方法设为static。 代码示例:
public class SyncTest4 {
    public static void main(String[] args) {
        Thread t1 = new Window4();
        Thread t2 = new Window4();
        Thread t3 = new Window4();
        t1.start();
        t2.start();
        t3.start();
    }
}

class Window4 extends Thread {
    private static int ticket = 100;

    public static synchronized void show() {
        //此时的同步监视器是Window4.class
        if (ticket > 0) {
            try {
                Thread.sleep(50);
            } catch (InterruptedException e) {
                e.printStackTrace();
            }
            System.out.println(Thread.currentThread().getName() + ":卖票,票号为:" + ticket);
            ticket--;
        }
    }

    @Override
    public void run() {
        while (true) {
            show();
        }
    }
}
1
2
3
4
5
6
7
8
9
10
11
12
13
14
15
16
17
18
19
20
21
22
23
24
25
26
27
28
29
30
31
32
33
34关于同步方法的总结:
- 同步方法仍然涉及到同步监视器,只是不需要我们显示的声明
- 非静态的同步方法,同步监视器仍是this;而静态的同步方法,同步监视器是当前类本身,这样才可以保证锁的唯一性和非共享性
# 线程安全的单例模式
class Student {
    private Student() {
    }

    private static Student instance = null;

    /**
     * 直接使用同步方法
     * @return
     */
    public synchronized static Student getInstance() {
        synchronized(Student.class){
            if (instance == null) {
                instance = new Student();
            }
            return instance;
        }
    }

    /**
     * 使用同步代码块
     * @return
     */
    public static Student getInstance1() {
        //方式一:效率稍差
//        synchronized(Student.class){
//            if (instance == null) {
//                instance = new Student();
//            }
//            return instance;
//        }

        //方式二:效率更高(建议使用)
        if (instance == null) {
            synchronized(Student.class){
                if (instance == null) {
                    instance = new Student();
                }
            }
        }
        return instance;
    }
}
2
3
4
5
6
7
8
9
10
11
12
13
14
15
16
17
18
19
20
21
22
23
24
25
26
27
28
29
30
31
32
33
34
35
36
37
38
39
40
41
42
43
# 线程的死锁问题
死锁:
- 不同的线程分别占用对方需要的同步资源不放弃,都在等待对方放弃自己需要的同步资源,就形成了线程的死锁
- 出现死锁后,不会出现异常,不会出现提示,只是所有的线程都处于阻塞状态,无法继续
解决方法:
- 专门的算法、原则
- 尽量减少同步资源的定义
- 尽量避免嵌套同步
# 死锁代码示例
@SuppressWarnings("all")
public class DeadLockTest {
    public static void main(String[] args) {
        StringBuffer s1 = new StringBuffer();
        StringBuffer s2 = new StringBuffer();
        new Thread(){
            @Override
            public void run() {
                synchronized (s1){
                    s1.append("a");
                    s2.append("1");
                    //线程1sleep时 线程2开始执行,先获取到锁s2
                    try {
                        Thread.sleep(100);
                    } catch (InterruptedException e) {
                        e.printStackTrace();
                    }
                    //线程1睡眠完 要拿到锁s2才能继续执行 而此时锁s2在线程2手中
                    synchronized (s2){
                        s1.append("b");
                        s2.append("2");
                        System.out.println(s1);
                        System.out.println(s2);
                    }
                }
            }
        }.start();
        new Thread(new Runnable() {
            @Override
            public void run() {
                //线程2获取到锁s2
                synchronized (s2){
                    s1.append("c");
                    s2.append("3");
                //线程2要继续执行 需要获取锁s1,但是此时因为线程1一直拿着锁s1,且因为线程1拿不到锁2,
                    // 所以线程1一直阻塞在获取锁s2的时候,所以形成了死锁
                    synchronized (s1){
                        s1.append("d");
                        s2.append("4");
                        System.out.println(s1);
                        System.out.println(s2);
                    }
                }
            }
        }).start();
    }
}
2
3
4
5
6
7
8
9
10
11
12
13
14
15
16
17
18
19
20
21
22
23
24
25
26
27
28
29
30
31
32
33
34
35
36
37
38
39
40
41
42
43
44
45
46
47
48
public class DeadLockDemo {
    public static void main(String[] args) {
        new Thread((new Dead("resource1","resource2")),"T1").start();
        new Thread((new Dead("resource2","resource1")),"T2").start();
    }
}

class Dead implements Runnable{
    private String resource1;
    private String resource2;

    public Dead(String resource1, String resource2) {
        this.resource1 = resource1;
        this.resource2 = resource2;
    }

    @Override
    public void run() {
        //锁的是字符串,且这两个字符串都是字面量定义,所以存在于字符串常量池中
        synchronized(resource1){
            System.out.println(Thread.currentThread().getName()+"获取"+resource1);
            try {
                TimeUnit.SECONDS.sleep(2);
            } catch (InterruptedException e) {
                e.printStackTrace();
            }
            synchronized (resource2){
                System.out.println(Thread.currentThread().getName()+"获取"+resource1);
            }
        }
    }
}
2
3
4
5
6
7
8
9
10
11
12
13
14
15
16
17
18
19
20
21
22
23
24
25
26
27
28
29
30
31
32
# Lock(同步锁)
- 从jdk5.0开始,java提供了更强大的线程同步机制——通过显式定义同步锁对象来实现同步。同步锁使用Lock对象充当
- java.util.concurrent.locks.Lock接口是控制多个线程对共享资源进行访问的工具。锁提供了对共享资源的独占访问,每次只能有一个线程对Lock对象加锁,线程开始访问共享资源之前应先获取Lock对象
- ReentrantLock类实现了Lock ,它拥有与synchronized相同的并发性和内存语义,在实现线程安全的控制中,比较常用的是ReentrantLock,可以显式加锁、释放锁。
代码示例:
/**
 * 解决线程安全问题的方式三:Lock锁
 * @author zdk
 * @date 2021/11/6 15:27
 */
public class LockTest {
    public static void main(String[] args) {
        Window window = new Window();
        Thread t1 = new Thread(window);
        Thread t2 = new Thread(window);
        Thread t3 = new Thread(window);
        t1.setName("窗口1");
        t2.setName("窗口2");
        t3.setName("窗口3");
        t1.start();
        t2.start();
        t3.start();
    }
}

class Window implements Runnable {
    private int ticket = 100;

    /**
     * 参数fair不写时默认为false。
     * 为true时会让线程的执行更公平:即不会让同一个线程连续多次获取资源执行
     * 即窗口1、2、3循环执行
     */
    private ReentrantLock lock = new ReentrantLock();

    @Override
    public void run() {
        while(true) {
            try {
                //2.调用锁定方法lock()
                lock.lock();
                if (ticket > 0){
                    try {
                        Thread.sleep(100);
                    } catch (InterruptedException e) {
                        e.printStackTrace();
                    }
                    System.out.println(Thread.currentThread().getName()+":卖票,票号为:"+ticket);
                    ticket--;
                }else{
                    break;
                }
            }finally {
                //3.调用解锁方法
                lock.unlock();
            }
        }
    }
}
2
3
4
5
6
7
8
9
10
11
12
13
14
15
16
17
18
19
20
21
22
23
24
25
26
27
28
29
30
31
32
33
34
35
36
37
38
39
40
41
42
43
44
45
46
47
48
49
50
51
52
53
54
# synchronized与Lock的异同?
- synchronized是内置的java关键字,而Lock是一个java类(接口)
- synchronized无法判断获取锁的状态,Lock可以判断是否获取到了锁
- 当线程2所需的锁被线程1获取时,使用Lock锁就不会让线程2一直等待下去:tryLock()和tryLock(long time,TimeUnit timeUnit)可以尝试获取锁
- synchronized是可重入锁,是不可以中断的,非公平的;
- synchronized适合锁少量的代码,Lock适合锁大量的代码
- Lock是显式锁(手动开启和关闭锁,别忘记关闭锁),synchronized是隐式锁,出了作用域自动释放
- Lock只有代码块锁,synchronized有代码块锁和方法锁
- 使用Lock锁,JVM将花费较少的时间来调度线程,性能更好。并且具有更好的扩展性(提供更多的子类)
- 优先使用顺序:Lock→同步代码块(已经进入了方法体,分配了相应资源)→同步方法(在方法体之外)
# 线程的通信
# 涉及到的三个方法
- wait():一旦执行此方法,当前线程就进入阻塞状态,并释放同步监视器
- notify():一旦执行此方法,就会唤醒被wait的一个线程。如果有多个线程被wait,唤醒优先级高的
- notifyAll():一旦执行此方法,就会唤醒所有被wait的线程
说明:
1.这三个方法必须使用在同步代码块或同步方法中
2.这三个方法的调用者,必须是同步代码块或同步方法中的同步监视器!!否则会出现IllegaLMonitorStateException异常
即以下示例代码中的obj的使用
3.这三个方法都定义在java.lang.Object类中
public class ThreadCommunicationTest {
    public static void main(String[] args) {
        Number number = new Number();
        Thread t1 = new Thread(number);
        Thread t2 = new Thread(number);
        t1.setName("线程1");
        t2.setName("线程2");
        t1.start();
        t2.start();
    }
}


class Number implements Runnable{

    private int number = 1;

    private Object obj = new Object();

    @Override
    public void run() {
        while (true){
//            synchronized (this){
            synchronized (obj){
                //唤醒另一线程
//                this.notify();
                obj.notify();
                if (number <= 100) {
                    try {
                        Thread.sleep(10);
                    } catch (InterruptedException e) {
                        e.printStackTrace();
                    }
                    System.out.println(Thread.currentThread().getName()+":"+number);
                    number++;
                    try {
                        //使得调用如下wait()方法的线程进入阻塞状态
                        //调用后会释放锁
//                        this.wait();
                        obj.wait();
                    } catch (InterruptedException e) {
                        e.printStackTrace();
                    }
                } else {
                    break;
                }
            }
        }
    }
}
2
3
4
5
6
7
8
9
10
11
12
13
14
15
16
17
18
19
20
21
22
23
24
25
26
27
28
29
30
31
32
33
34
35
36
37
38
39
40
41
42
43
44
45
46
47
48
49
50
51
# 面试题:sleep()和wait()的异同
相同点:一旦执行方法,都可以使得当前的线程进入阻塞状态
不同点:1.两个方法声明的位置不同:sleep()在Thread类中,wait()在Object类中;
2.调用的要求不同:sleep()可以在任何需要的场景下调用;wait()必须使用在同步代码块或同步方法中(因为要先获得锁)
3.关于是否释放同步监视器:如果两个方法都使用在同步代码块或同步方法中,sleep()不会释放锁,而wait()会释放锁
# 生产者消费者问题

代码:
public class Exercise {
    public static void main(String[] args) {
        Clerk clerk = new Clerk(0);
        Producer producer = new Producer(clerk);
        Customer customer = new Customer(clerk);
        Thread producerThread = new Thread(producer);
        producerThread.setName("生产者");
        Thread customerThread1 = new Thread(customer);
        Thread customerThread2 = new Thread(customer);
        customerThread1.setName("消费者1");
        customerThread2.setName("消费者2");
        producerThread.start();
        customerThread1.start();
        customerThread2.start();
    }
}

class Producer implements Runnable {
    private Clerk clerk;

    public Producer(Clerk clerk) {
        this.clerk = clerk;
    }

    @Override
    public void run() {
        System.out.println(Thread.currentThread().getName() + "开始生产产品...");
        while (true) {
            try {
                Thread.sleep(50);
            } catch (InterruptedException e) {
                e.printStackTrace();
            }
            clerk.produceProduct();
        }
    }
}

class Customer implements Runnable {
    private Clerk clerk;

    public Customer(Clerk clerk) {
        this.clerk = clerk;
    }

    @Override
    public void run() {
        System.out.println(Thread.currentThread().getName() + "开始消费...");
        while (true) {
            try {
                Thread.sleep(500);
            } catch (InterruptedException e) {
                e.printStackTrace();
            }
            clerk.consumeProduct();
        }
    }
}

class Clerk {
    private int goods;

    public Clerk(int goods) {
        this.goods = goods;
    }

    public synchronized void produceProduct() {
        if (goods < 20) {
            goods++;
            System.out.println(Thread.currentThread().getName() + "开始生产第" + goods + "个产品");
            //生产者生产一个以后 即可唤醒消费者
            notify();
        } else {
            try {
                //不需要生产时,生产者等待
                wait();
            } catch (InterruptedException e) {
                e.printStackTrace();
            }
        }

    }

    public synchronized void consumeProduct() {
        if (goods > 0) {
            System.out.println(Thread.currentThread().getName() + "开始消费第" + goods + "个产品");
            goods--;
            //消费者消费一个以后,即可唤醒生产者让其继续生产
            notify();
        } else {
            try {
                //无商品可消费时,消费者等待
                wait();
            } catch (InterruptedException e) {
                e.printStackTrace();
            }
        }
    }
}
2
3
4
5
6
7
8
9
10
11
12
13
14
15
16
17
18
19
20
21
22
23
24
25
26
27
28
29
30
31
32
33
34
35
36
37
38
39
40
41
42
43
44
45
46
47
48
49
50
51
52
53
54
55
56
57
58
59
60
61
62
63
64
65
66
67
68
69
70
71
72
73
74
75
76
77
78
79
80
81
82
83
84
85
86
87
88
89
90
91
92
93
94
95
96
97
98
99
# jdk5新增的创建线程的两种方式
# 方式一:实现Callable接口
与Runnable接口相比,Callable功能更强大
- 相比run()方法,call()可以有返回值
- call()方法可以抛出异常
- Callable支持泛型的返回值
- 需要借助FutureTask类,比如获取返回结果
- Future接口
- 可以对具体Runnable、Callable任务的执行结果进行取消、查询是否完成、获取结果等
- FutureTask是Futrue接口的唯一的实现类
- FutureTask同时实现了Runnable,Future接口。它既可以作为Runnable被线程执行,又可以作为Future得到Callable的返回值
代码示例和说明:
//1.创建一个实现了Callable接口的实现类
class NumberCallable implements Callable<Integer> {
    //2.实现call()方法,将线程要执行的操作声明在call()中
    @Override
    public Integer call() throws Exception {
        int sum = 0;
        for (int i = 0; i <= 100; i++) {
            if (i % 2 == 0) {
                sum += i;
            }
        }
        return sum;
    }
}

/**
 * @author zdk
 * @date 2021/11/6 17:25
 */
public class CallableTest {
    public static void main(String[] args) {
        //3.创建Callable接口实现类的对象
        NumberCallable numberCallable = new NumberCallable();
        //4.将此Callable接口实现类的对象作为参数传递到FutureTask的构造器中,创建FutureTask对象
        FutureTask<Integer> futureTask = new FutureTask<>(numberCallable);
        //5.将FutureTask的对象作为参数传递到Thread的构造器中,创建Thread对象,调用其start()
        new Thread(futureTask,"A").start();
        new Thread(futureTask,"B").start();
        try {
            //6.可以通过FutureTask对象的get()方法获取call()方法的返回值
            //get()返回值即为FutureTask构造器参数Callable实现类重写的call()的返回值
            //get()会产生阻塞
            Integer sum = futureTask.get();
            System.out.println(sum);
        } catch (InterruptedException | ExecutionException e) {
            e.printStackTrace();
        }
    }
}
2
3
4
5
6
7
8
9
10
11
12
13
14
15
16
17
18
19
20
21
22
23
24
25
26
27
28
29
30
31
32
33
34
35
36
37
38
39
new Thread(futureTask,"A").start(); new Thread(futureTask,"B").start();
- 启动两个一样的线程,实际只会输出一个sum,是因为在多线程并发的情况下使用Callable,运行结果会做缓存处理,提高效率
- 使用get()获取返回值时可能会阻塞,所以一般放在程序最后执行,或者采用异步调用获取方式
# 方式二:使用线程池
- 背景:经常创建和销毁、使用量特别大的资源,比如并发情况下的线程,对性能影响很大
- 思路:提前创建好多个线程,放入线程池中,使用时直接获取,使用完放回池中。可以避免频繁创建和销毁、实现重复利用。
- 好处:
- 提高响应速度(减少了创建新线程的时间)
- 降低资源消耗(重复利用线程池中线程,不需要每次都创建)
- 便于线程管理
- corePoolSize:核心池的大小
- maximumPoolSize:最大线程数
- keepAliveTime:线程没有任务时最多保持多长时间后会终止
# 线程池相关API
- JDK5.0起提供了线程池相关API:ExecutorService和 Executors
- ExecutorService:真正的线程池接口。常见实现类:ThreadPoolExecutor
- void execute(Runnable command):执行任务、命令,没有返回值,一般用来执行Runnable
- < T> Future< T> submit(Callable< T> task):执行任务,有返回值,一般用来执行Callable
- void shutdown():关闭连接池
- Executors:工具类、线程池的工厂类,用于创建并返回不同类型的线程池
- Executors.newCachedThreadPool():创建一个可根据需要创建新线程的线程池
- Executors.newFixedThreadPool(n);创建一个可重用固定线程数的线程池
- Executors.newSingleThreadExecutor():创建一个只有一个线程的线程池
- Executors.newScheduledThreadPool(n):创建一个线程池,它可安排在给定延迟后运行命令或者定期地执行。
代码示例:
public class ThreadPool {
    public static void main(String[] args) {
        //提供指定线程数量的线程池
        ExecutorService executorService = Executors.newFixedThreadPool(10);
        //execute(Runnable runnable) 适用于Runnable
        executorService.execute(new NumberThread());
        //submit(Callable callable) 适用于Callable
        executorService.execute(new NumberThread1());
        //关闭连接池
        executorService.shutdown();
    }
}

class NumberThread implements Runnable {
    @Override
    public void run() {
        int sum = 0;
        for (int i = 0; i <= 100; i++) {
            if (i % 2 == 0) {
                sum += i;
            }
        }
        System.out.println("偶数sum = " + sum);
    }
}

class NumberThread1 implements Runnable {
    @Override
    public void run() {
        int sum = 0;
        for (int i = 0; i <= 100; i++) {
            if (i % 2 != 0) {
                sum += i;
            }
        }
        System.out.println("奇数sum = " + sum);
    }
}
2
3
4
5
6
7
8
9
10
11
12
13
14
15
16
17
18
19
20
21
22
23
24
25
26
27
28
29
30
31
32
33
34
35
36
37
38


